3M Car Rubbing Compound How to Achieve Flawless Results
3m car rubbing compound is an essential topic that provides valuable insights.
Key Takeaways
- 3M car rubbing compound is a trusted, reliable choice for paint correction and defect removal.
- Choose the right grit level: heavy-cut for deep defects, medium for swirl marks, and fine for finishing.
- Always prep your vehicle before applying compound to avoid creating new scratches.
- Use a dual-action polisher with the correct foam pad for the best safety and results.
- Work in small sections with overlapping passes and light pressure to prevent heat damage.
- Follow up with polish and protectant to refine the surface and lock in your results.
- Avoid common mistakes like using too much pressure, skipping prep, and working in direct sunlight.
📑 Table of Contents
- What Is 3M Car Rubbing Compound?
- Why Use 3M Car Rubbing Compound for Paint Correction?
- How to Use 3M Car Rubbing Compound: Step-by-Step Guide
- Common Mistakes to Avoid When Using 3M Car Rubbing Compound
- Quick Tips for the Best Results
- Expert Insights: What Professional Detailers Say
- 3M Car Rubbing Compound vs Other Leading Brands
- When Should You Not Use a Rubbing Compound?
- Conclusion
What Is 3M Car Rubbing Compound?
3M car rubbing compound is a specially formulated abrasive paste designed to remove thin layers of paint. This process eliminates surface defects like swirl marks, fine scratches, and oxidation. The compound works by gently leveling the clear coat, revealing a smoother and more reflective surface underneath. 3M has been a leader in automotive products for decades, and their rubbing compounds are no exception.
Unlike a regular polish, a rubbing compound is more aggressive. It removes more material and tackles bigger imperfections. However, 3M offers different levels of abrasiveness so you can choose the right one for your needs. Some compounds are meant for heavy correction, while others are lighter and work well as a first step in a multi-step process.
The key to understanding 3M car rubbing compound is knowing that it is a tool, not a magic wand. It works best when paired with the right pad, machine, and technique. When used correctly, it can transform the look of your car’s paint in just a single session.
How Does It Work on Automotive Paint?
When you apply compound to your car’s surface, the tiny abrasive particles create friction. This friction removes a microscopic layer of the clear coat. In doing so, it lifts away embedded contaminants and levels out uneven areas. The result is a more uniform surface that reflects light more evenly.
Think of it like sanding a rough wooden table before applying finish. You are not removing the table. You are creating a smooth canvas. The same principle applies to your car’s paint. The 3M car rubbing compound smooths out the imperfections so that your final polish or wax can bond properly and look its best.
Why Use 3M Car Rubbing Compound for Paint Correction?
Not all rubbing compounds are created equal. 3M car rubbing compound stands out for several important reasons. First, 3M uses consistent quality control. Every batch of compound is tested to ensure it performs the same way every time. This reliability is something you cannot put a price on when you are working on your car.
Second, 3M offers a range of compounds for different levels of correction. Whether you need something heavy for deep swirl marks or something lighter for a simple refresh, there is a product for the job. This flexibility makes 3M car rubbing compound suitable for beginners and professionals alike.
Third, 3M products are widely available. You can find them at most auto parts stores, online retailers, and detailing shops. This means you do not have to search hard to get the right product. And with proper usage, you will see noticeable improvement in your paint’s clarity and depth.
Understanding Compound Grit Levels
Not all 3M car rubbing compound products are the same aggressiveness. They come in different grit levels, which determine how much paint they remove. Here is a simple breakdown:
- Heavy-cut compounds: These remove more paint and are best for deep scratches and heavy oxidation. Use them carefully and only when needed.
- Medium-cut compounds: A balanced option that handles most common imperfections like swirl marks and light scratches.
- Fine compounds: These are the least aggressive. They work well as a finishing step to smooth the surface after heavier correction.
Choosing the right grit is essential. Using a heavy-cut compound when a fine one will do can remove too much clear coat. On the other hand, using a fine compound on heavy defects will not get the job done. Always assess your paint condition first and pick accordingly.
Compound vs Polish: What Is the Difference?
This is one of the most common questions people ask. A rubbing compound is more abrasive than a polish. It removes more paint and tackles bigger problems. A polish is finer and is used after the compound to refine the surface and add gloss.
In a typical paint correction process, you would use a 3M car rubbing compound first, followed by a polish. This two-step approach gives you the best of both worlds. The compound does the heavy lifting, and the polish brings out the final shine. Skipping the compound and going straight to polish will not fix deeper imperfections.
| Feature | Rubbing Compound | Polish |
|---|---|---|
| Abrasiveness | Higher | Lower |
| Paint Removal | More material removed | Less material removed |
| Best For | Swirl marks, scratches, oxidation | Final shine and refinement |
| Usage Order | First step | Second step |
| 3M Product Example | 3M Perfect-It Compound | 3M Perfect-It Polish |
How to Use 3M Car Rubbing Compound: Step-by-Step Guide
Using 3M car rubbing compound correctly is all about following a clear process. Rushing through the steps or skipping preparation can lead to poor results or even paint damage. Follow this guide to get the best outcome every time.
Step 1: Prep Your Vehicle Properly
Before you touch any compound to your paint, the surface must be clean. Start by washing your car thoroughly with a quality car shampoo. Use a two-bucket method to avoid reintroducing dirt onto the paint. Rinse well and dry with a clean micro-fiber towel or a blower.
Next, inspect the paint under good lighting. Look for swirl marks, scratches, and areas of oxidation. This assessment will help you choose the right compound and pad. If you have heavy contamination, consider using a clay bar before moving on to the compound stage.
Proper prep is the foundation of great results. Skipping this step means you are rubbing compound over dirt, which can create new scratches. Take your time here and the rest of the process will go much smoother.
Step 2: Choose the Right Pad and Machine
The pad and machine you use matter just as much as the compound itself. For 3M car rubbing compound, a dual-action polisher is the best choice for most users. It is safer for beginners because it reduces the risk of burning through the clear coat.
When it comes to pads, choose a foam cutting pad for heavy correction and a finishing pad for lighter work. Color coding helps here. Most pad brands use orange or red for cutting and white or yellow for finishing. Match your pad to the compound grit level you selected earlier.
If you are using an orbital polisher, make sure it has enough power to handle the compound. A weaker machine will require more passes and more time, which increases the risk of heat buildup. Always check your machine’s specifications before starting.
Step 3: Apply the Compound Correctly
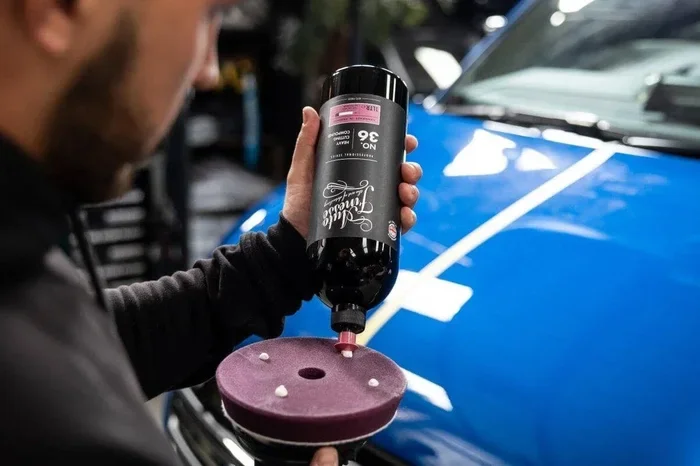
Squeeze a few dime-sized drops of 3M car rubbing compound onto the pad. Do not dump too much. You want enough to cover the working area without dripping. Spread the compound across the pad by running the machine at low speed before you start working on the paint.
Work on one section at a time. A good size is about two square feet. This keeps the compound from drying out before you can buff it off. Apply light, even pressure and let the machine do the work. Pushing too hard is one of the biggest mistakes beginners make.
Keep the machine moving at all times. Never let it sit in one spot for too long. Heat buildup can damage the clear coat and create a phenomenon called “hazing.” Moving steadily gives the compound time to work without overheating the surface.
Step 4: Work in Overlapping Passes
Move the polisher in overlapping passes across each section. Start at the edges and work your way toward the center. This technique ensures full coverage and prevents missed spots. Use slow, steady movements and let the abrasive action do the heavy lifting.
For heavy correction, make two or three passes over each area. For lighter work, one pass may be enough. After each pass, check the surface by wiping it with a clean micro-fiber towel. You want to see the defects fading and the surface becoming smoother.
Switch pads if needed. A cutting pad that has been loaded with compound becomes less effective over time. Having a few backup pads on hand is a smart move. Clean your pads between sections to maintain consistent cutting action.
Step 5: Wipe, Inspect, and Move to the Next Step
Once you have finished a section, wipe it down with a clean microfiber towel. Remove all residue from the compound. Inspect the area under bright light to check for remaining defects. If you still see swirl marks or scratches, you may need to repeat the process on that section.
After the compound stage is complete, your paint will look improved but not yet perfect. This is normal. The compound has removed the defects, but the surface still needs refinement. Apply a finishing polish next to smooth out any micro-marring left by the compound. Finally, seal the work with a coat of wax or ceramic coating for protection.
Common Mistakes to Avoid When Using 3M Car Rubbing Compound
Even the best products can cause problems if used incorrectly. Here are the most common mistakes people make when working with 3M car rubbing compound and how to avoid them.
- Using too much pressure: Let the machine and compound do the work. Pressing too hard causes heat buildup and can damage the clear coat.
- Skipping the prep work: Never apply compound to a dirty surface. Dirt trapped under the pad creates new scratches and ruins your paint.
- Using the wrong pad: A cutting pad for heavy work and a finishing pad for light work. Using the wrong one leads to poor results or paint damage.
- Letting the compound dry on the paint: Dried compound is hard to remove and can leave haze. Keep the surface lubricated and work in small sections.
- Not checking your progress: Wipe and inspect frequently. This helps you catch remaining defects early and avoid over-polishing.
- Working in direct sunlight: Heat from the sun dries the compound too fast and increases the risk of burning the paint. Always work in a shaded area or indoors.
Avoiding these mistakes will save you time, money, and potentially your car’s paint. Take it slow, follow the steps, and trust the process.
Quick Tips for the Best Results
Here are some practical tips that experienced detailers swear by when using 3M car rubbing compound:
- Start with the least aggressive option: Begin with a medium-cut compound before trying a heavy one. You can always go back for more correction if needed.
- Keep your pads clean: Wash foam pads between uses. Buildup reduces their effectiveness and can contaminate your paint.
- Use a paint depth gauge: This tool helps you measure how much clear coat you have left. It is especially useful on older cars where the clear coat may be thin.
- Work in cool conditions: Ideal temperatures are between 60 and 75 degrees Fahrenheit. This gives you more control and prevents the compound from drying too fast.
- Use plenty of lighting: A good LED light or a paint inspection light reveals defects that are invisible in normal lighting. You cannot fix what you cannot see.
- Take breaks: Both you and your car benefit from breaks during long sessions. It keeps you fresh and prevents heat buildup on the paint.
Expert Insights: What Professional Detailers Say
Professional detailers who work with 3M car rubbing compound every day share a few insights that can level up your game. First, they always test the compound on a small hidden area before committing to the whole car. This lets you see how the compound interacts with your specific paint type and clear coat condition.
Second, experts emphasize the importance of pad selection. The right foam pad makes a huge difference in cutting power and finishing quality. Many detailers keep a variety of pads on hand and switch between them depending on the stage of correction.
Third, professionals know that paint correction is a process, not a single step. They use multiple compound and polish stages to achieve the best results. Each stage refines the paint further, removing the defects left by the previous step. This layered approach takes more time but delivers a level of clarity that a single-step process cannot match.
Finally, experienced detailers always finish with a quality protectant. After all the hard work of correction, you want to lock in that shine. A good wax, sealant, or ceramic coating protects the freshly corrected paint from environmental damage and keeps it looking great for months.
3M Car Rubbing Compound vs Other Leading Brands
There are several rubbing compounds on the market, but how does 3M car rubbing compound compare? Here is a quick look at how it stacks up against other popular brands:
| Brand | Cut Level | Ease of Use | Price Range | Best For |
|---|---|---|---|---|
| 3M Perfect-It Compound | Medium to Heavy | Excellent | Mid-Range | General paint correction and swirl removal |
| Meguiars Ultimate Compound | Medium | Very Good | Mid-Range | Light to moderate defects and everyday use |
| Menzerna 3500 | Heavy | Good | Budget | Heavy correction on thick clear coats |
| Chemical Guys V36 | Heavy to Medium | Good | Budget | Budget-friendly heavy correction |
3M car rubbing compound offers a great balance of performance and ease of use. It is not the cheapest option, but the consistency and reliability make it worth the investment. For most car owners, 3M delivers the best overall value and results.
When Should You Not Use a Rubbing Compound?
While 3M car rubbing compound is a powerful tool, it is not always the right choice. If your paint only has minor dullness and no visible defects, a simple polish or wax may be enough. Using a compound when it is not needed removes healthy clear coat unnecessarily.
Also, avoid using a rubbing compound on fresh paint. New cars with clear coats less than a year old should not be compound-treated unless there is a specific defect. The clear coat on new vehicles is still curing and is more sensitive to abrasion.
Finally, if your car has deep scratches that go beyond the clear coat, a rubbing compound will not fix them. Deep scratches require paint touch-up or professional repair. Knowing the limits of what a compound can do saves you time and prevents frustration.
Conclusion
3M car rubbing compound is a powerful and reliable tool for anyone looking to restore their car’s paint. From removing swirl marks and light scratches to tackling surface oxidation, it delivers real results when used correctly. The key is to follow the proper steps, choose the right pads and machine, and avoid the common mistakes we covered.
Remember that paint correction is a skill that improves with practice. Do not get discouraged if your first attempt is not perfect. Each session teaches you something new about your car’s paint and how it responds to different compounds and pads. With patience and attention to detail, you can achieve results that look professional and last for months.
Start with a small section, work slowly, and always inspect your progress. Pair your 3M car rubbing compound with a quality polish and a good protectant, and your car will look better than it has in years. The effort you put in now pays off with a stunning, long-lasting finish that turns heads wherever you go.
Frequently Asked Questions
Can I use 3M car rubbing compound by hand without a machine?
Yes, you can apply 3M car rubbing compound by hand, but it requires significantly more effort and time. Hand application works best for small areas or light correction. For full-body paint correction, a machine polisher is strongly recommended for consistent and efficient results.
How often should I use a rubbing compound on my car?
You should only use a rubbing compound when your paint has visible defects like swirl marks or oxidation. Overusing compound removes healthy clear coat and thins the paint over time. Most cars only need compound treatment once or twice a year as part of a regular detailing schedule.
Is 3M car rubbing compound safe on all paint types?
3M compounds are generally safe on most automotive paint types, including single-stage and clear-coat finishes. However, always check the product label and test on a small hidden area first. Older cars with thin clear coats require extra caution to avoid removing too much paint.
What is the difference between 3M rubbing compound and 3M polish?
A rubbing compound is more abrasive and removes more paint to fix defects. A polish is finer and is used after the compound to refine the surface and add gloss. Most paint correction routines use both in sequence for the best outcome.
Can I use 3M car rubbing compound on a new car?
It is generally not recommended to use a rubbing compound on a new car unless there is a specific defect. New clear coats are still curing and are more sensitive to abrasion. If your new car has swirl marks from improper washing, a very fine compound used with care may be appropriate.
What pads should I pair with 3M car rubbing compound?
Use a foam cutting pad for heavy correction and a finishing pad for lighter work. The pad color usually indicates its purpose, with orange and red for cutting and white and yellow for finishing. Always match the pad aggressiveness to the compound grit level you are using.
=== CONCLUSION ===
3M car rubbing compound is a proven, effective solution for restoring your car’s paint to its best condition. With the right technique, the proper tools, and a little patience, you can achieve results that rival professional detailing shops. Follow the steps outlined in this guide, avoid the common pitfalls, and enjoy the satisfaction of a flawless, mirror-like finish on your vehicle.