How Do You Tighten a Loose Heat Shield on Your Vehicle
Tightening a loose heat shield is a simple DIY fix that stops annoying rattles and protects your vehicle from heat damage. You’ll need basic tools like a wrench, wire ties, and a little patience. This guide walks you through every step to secure the shield and prevent future problems.
A loose heat shield can turn a smooth drive into a noisy, annoying experience. That metallic rattle every time you hit a bump is hard to ignore, and it’s often a sign that the shield protecting your vehicle from extreme heat has shifted. Tightening a loose heat shield is one of the most common and easiest repairs you can do at home. It saves you money, keeps your car safe, and stops that irritating sound in its tracks.
Heat shields are thin metal pieces that wrap around the exhaust system. They prevent scorching heat from reaching plastic parts, fuel lines, and the cabin floor. When one comes loose, it can vibrate against the exhaust and create a persistent rattle. More importantly, a missing or damaged shield can lead to melted wiring, fire hazards, and costly damage to other components. Securing your heat shield is a quick job that anyone with basic tools can handle.
In this guide, you’ll learn exactly how to find the loose shield, gather the right tools, and tighten it properly. We’ll also cover common mistakes, when replacement is the better choice, and tips to keep your shields tight for years. By the end, you’ll have the confidence to tackle this repair yourself and enjoy a quieter, safer ride.
Key Takeaways
- Safety first: Always let the engine cool completely before touching any exhaust components.
- Identify the cause: Loose bolts, broken clips, or rust are the usual culprits behind a rattling heat shield.
- Use the right fasteners: Replace worn clips with stainless steel screws or high-quality wire ties for a lasting fix.
- Check clearances: Ensure the shield doesn’t touch the exhaust pipe or moving parts after tightening.
- Know when to replace: A heavily corroded or warped shield needs full replacement, not just tightening.
- Prevent future issues: Regular undercarriage inspections and using anti-seize compound on bolts can stop loosening.
📑 Table of Contents
- Understanding Your Vehicle’s Heat Shield
- Signs Your Heat Shield Is Loose
- Tools and Materials You’ll Need
- Step-by-Step Guide to Tighten a Loose Heat Shield
- Comparing Tightening Methods
- Common Mistakes to Avoid
- When to Replace the Heat Shield Instead of Tightening
- Expert Tips for Preventing Future Loose Heat Shields
- Conclusion
Understanding Your Vehicle’s Heat Shield
What Does a Heat Shield Do?
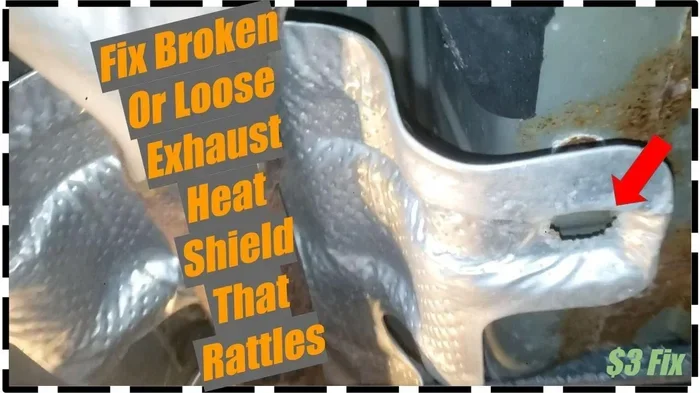
A heat shield is a stamped metal panel that attaches to the exhaust manifold, downpipe, or catalytic converter. Its job is to block radiant heat from reaching sensitive parts underneath the car. Without it, the intense temperatures from the exhaust system can damage fuel lines, brake lines, and even the transmission tunnel. The shield also helps reduce underbody heat soak, keeping the cabin cooler on hot days.
Most vehicles have multiple heat shields. You might find one near the exhaust manifold, another under the catalytic converter, and sometimes a third near the muffler. Each one is held in place by bolts, spring clips, or self-tapping screws. Over time, vibration and exposure to road grime can cause these fasteners to loosen or break.
Why Heat Shields Come Loose
Heat shields endure a harsh environment. They face extreme temperature changes, road salt, water, and constant vibration from the engine. Rust is the number one enemy of these metal panels. As the mounting points corrode, the bolts lose their grip and the shield begins to move. Broken spring clips are another common cause. Even a small gap can let the shield vibrate against the exhaust pipe, creating that unmistakable rattle.
Sometimes, a loose heat shield is simply the result of a previous repair that wasn’t done correctly. A mechanic might have used the wrong clip size or failed to tighten a bolt to the proper torque. Whatever the reason, the fix is usually straightforward once you locate the problem area.
Signs Your Heat Shield Is Loose
You don’t need to crawl under the car to suspect a loose heat shield. Your ears and a few simple checks can tell you a lot. Here are the most common signs:
- Rattling noise: A metallic clatter that gets louder when you idle or accelerate. It often goes away when you press the gas pedal.
- Visual inspection: Look under the car for a metal panel that appears to be hanging or touching the exhaust pipe.
- Burning smell: If the shield has shifted and is touching plastic parts or wiring, you might smell a faint burning odor.
- Heat soak: The cabin or undercarriage feels hotter than normal after driving, especially in stop-and-go traffic.
- Check engine light: In rare cases, a loose shield can vibrate a sensor connector loose, triggering a warning light.
If you notice any of these symptoms, it’s important to tighten a loose heat shield as soon as possible. Driving with a loose shield can cause the metal to scrape against the exhaust, creating sparks or even a fire risk in extreme cases.
Tools and Materials You’ll Need
Gathering everything before you start makes the job faster and safer. You don’t need fancy equipment, but having the right items on hand will make a big difference.
Essential Tools
- Ratchet and socket set (metric and standard sizes)
- Combination wrench set
- Screwdrivers (Phillips and flathead)
- Pliers and wire cutters
- Stainless steel self-tapping screws or machine screws
- High-quality spring clips or hose clamps
- Wire ties (heavy-duty, heat-resistant)
- Anti-seize compound or dielectric grease
- Rust penetrant spray (like WD-40 or PB Blaster)
- Safety glasses and work gloves
Safety Gear and Precautions
Always work on a cool engine. The exhaust system can retain heat for hours after driving. Wear safety glasses to protect your eyes from rust flakes or falling bolts. Gloves will keep your hands clean and protect against sharp metal edges. If you need to raise the vehicle, use jack stands and never rely on a jack alone. A creeper or a bright flashlight can also make it easier to see under the car.
Step-by-Step Guide to Tighten a Loose Heat Shield
Follow these steps carefully to secure your heat shield and eliminate the rattle. Each step builds on the previous one, so don’t skip ahead.
Step 1: Locate the Loose Heat Shield
Start the engine and let it idle for a minute. Listen for the rattle and try to pinpoint where it’s coming from. Then turn off the engine and let it cool for at least 30 minutes. Crawl under the vehicle and look for the metal shield that’s moving or touching the exhaust pipe. Follow the exhaust system from the engine back to the rear of the car. You’ll likely find a shield that’s hanging lower than the others or has a bolt missing.
Step 2: Clean the Area Thoroughly
Use a wire brush or a rag to clean rust and grime off the mounting points. You need to see the bare metal to ensure a solid connection. Spray rust penetrant on any seized bolts and let it sit for a few minutes. This will make it much easier to remove old fasteners without snapping them. If a bolt is completely rusted in, you may need to drill it out and replace it with a new one.
Step 3: Reattach Using the Right Fastener
Once the area is clean, you can reattach the shield. The method depends on what was originally there and what’s available. Here are the three most common approaches:
- Bolts and nuts: If the original mounting holes are intact, thread a new bolt through the shield and tighten it with a ratchet. Apply a thin coat of anti-seize compound to the threads to prevent future corrosion.
- Spring clips: Some shields use spring steel clips that snap into pre-drilled holes. Press the clip firmly into place with pliers. If the clip is bent or broken, replace it with a new one.
- Self-tapping screws or wire ties: For temporary or lightweight fixes, you can use stainless steel self-tapping screws or heavy-duty wire ties. Drill a small pilot hole if needed, then secure the shield. Wire ties work well for non-critical areas but should be heat-resistant.
After reattaching, manually move the shield to ensure it’s snug. There should be no play or gap between the shield and the exhaust pipe. The goal is a firm, quiet fit without any contact that could cause vibration.
Step 4: Check Clearances and Fit
Start the engine and let it idle. Listen carefully for any remaining noise. Then take the car for a short test drive over bumps and at highway speeds. Pay attention to the area where you worked. If the rattle returns, the shield may still be loose or a clip might not be seated properly. Turn off the engine and recheck all fasteners. Make sure the shield doesn’t rub against the exhaust pipe or any moving parts like the driveshaft or suspension components.
Comparing Tightening Methods
Not all fastening methods are created equal. The right choice depends on the condition of the mounting points and how much stress the shield endures. Here’s a quick comparison to help you decide.
| Method | Best For | Durability | Ease of Use | Cost |
|---|---|---|---|---|
| Bolts and nuts | Intact mounting holes, high stress | Excellent | Moderate | Low |
| Spring clips | Original factory clips, quick access | Good | Easy | Low |
| Self-tapping screws | Small gaps, temporary fix | Fair | Easy | Very low |
| Heavy-duty wire ties | Non-critical areas, emergency repair | Poor to fair | Very easy | Very low |
| Hose clamps | Wrapping around pipes, irregular shapes | Good | Moderate | Low |
For a permanent fix, bolts and nuts are the gold standard. They provide the strongest hold and can withstand the constant vibration of the road. Spring clips are great when the original hardware is still in good shape. Self-tapping screws and wire ties are handy for quick repairs, but they’re not meant to last forever. Replace them with proper fasteners as soon as possible.
Common Mistakes to Avoid
Even a simple repair can go wrong if you’re not careful. Here are the most common mistakes people make when tightening a heat shield:
- Using the wrong size fastener: A bolt that’s too short won’t grip properly, and one that’s too long can damage the exhaust pipe. Always match the original size or choose a close replacement.
- Over-tightening: Cranking a bolt too hard can strip the threads in the shield or the mounting bracket. Tighten until snug, then give it just a quarter turn more.
- Ignoring rust: If you just re-tighten a bolt in a rusted hole, it will loosen again quickly. Clean the rust, apply anti-seize, and consider using a larger bolt or a helicoil insert if the hole is damaged.
- Not checking for cracks: A loose shield can develop stress cracks at the mounting points. Inspect the metal carefully before reattaching. A cracked shield needs replacement, not tightening.
- Forgetting to check the exhaust hangers: Sometimes a rattling heat shield is actually caused by a loose exhaust hanger. If the entire exhaust system is sagging, tightening the heat shield won’t fix the noise.
Avoiding these pitfalls will save you time and ensure a lasting repair. Take your time, inspect everything, and don’t rush the process.
When to Replace the Heat Shield Instead of Tightening
Signs the Shield Is Beyond Repair
There are times when tightening just isn’t enough. If the heat shield shows any of the following signs, it’s time to replace it entirely:
- Heavy rust or holes: If the metal is corroded through, it can’t provide proper protection. A hole in the shield can let heat reach fuel lines or the transmission tunnel.
- Warped or bent shape: A shield that has been bent out of shape by impact or extreme heat won’t sit flush against the exhaust. It will continue to rattle even if you bolt it down.
- Missing mounting points: If the bolt holes have torn out of the shield or the bracket, there’s no secure way to reattach it.
- Cracks near the flanges: The areas where the shield meets the exhaust pipe are under the most stress. Cracks here mean the metal has fatigued and needs replacement.
Replacing a heat shield is straightforward. You can buy aftermarket shields for most vehicle models at auto parts stores for under $50. The process is similar to tightening, but you’ll need to remove the old shield completely and bolt on the new one. Apply anti-seize to all new bolts and torque them to the manufacturer’s specification if you can find it.
Expert Tips for Preventing Future Loose Heat Shields
Regular Inspection Routine
Make it a habit to glance under your car every few months. Look for any shields that appear to be sagging or have missing bolts. A quick 30-second check can catch a small problem before it turns into a loud rattle or expensive damage. Pay special attention after driving through deep water or heavy salt roads, as these conditions accelerate rust and loosening.
Use High-Quality Fasteners
Don’t reuse old bolts that are stretched or corroded. Invest in stainless steel or grade 5 bolts for your heat shield mounts. These materials resist rust and hold their tension much longer than cheap hardware. A small pack of stainless self-tapping screws or a set of metric bolts costs very little but can save you from repeat trips under the car.
Apply Anti-Seize Compound
Before you bolt any heat shield back in place, put a thin layer of anti-seize compound on the threads. This prevents the bolt from seizing due to heat and vibration. It also makes future removal easier if you ever need to inspect or replace the shield again. Dielectric grease works well for this purpose too, especially on electrical connectors near the exhaust.
Consider Adding a Second Clip
If a heat shield keeps loosening in the same spot, you can add an extra clip or screw to reinforce it. Just make sure the new fastener doesn’t interfere with the exhaust pipe or any moving parts. A small piece of rubber hose slipped between the shield and the pipe can also dampen vibration and stop the rattle without adding more metal-on-metal contact.
Conclusion
Learning how to tighten a loose heat shield is a valuable skill for any vehicle owner. It’s a quick, affordable repair that improves your driving experience and protects your car from heat damage. With the right tools, a little patience, and the steps outlined in this guide, you can eliminate that annoying rattle and get back to enjoying a quiet, smooth ride.
Remember to always work on a cool engine, clean the mounting points thoroughly, and use quality fasteners that resist rust. If the shield is too damaged to save, don’t hesitate to replace it. A new heat shield costs very little and can prevent much larger repair bills down the road. Take a few minutes to inspect your undercarriage regularly, and you’ll catch loose shields before they become a serious problem. Your car will thank you with a quieter, safer, and longer-lasting ride.
Frequently Asked Questions
Can I drive with a loose heat shield?
You can drive a short distance if the shield is only slightly loose, but it’s not recommended for long trips. A loose shield can vibrate against the exhaust, causing sparks, melting nearby plastic parts, or even starting a fire. It’s best to tighten a loose heat shield as soon as you notice the rattle.
How much does it cost to fix a loose heat shield?
If you do it yourself, the cost is usually under $10 for new bolts, clips, or wire ties. A mechanic will charge between $100 and $200 for labor, depending on the vehicle and how accessible the shield is. The part itself is often very inexpensive or sometimes free if the shield is still in good condition.
What causes a heat shield to rattle even after tightening?
A persistent rattle after tightening usually means the mounting holes are stripped, the shield is warped, or there’s an exhaust leak nearby. Check that all fasteners are snug and that the shield isn’t bent. If the holes are damaged, you may need to use a larger bolt or a helicoil insert to restore a tight fit.
Can I use a wire tie instead of a bolt for a heat shield?
Wire ties can work as a temporary fix in non-critical areas, but they’re not a permanent solution. The heat from the exhaust can melt standard plastic ties, so always use heat-resistant wire ties rated for high temperatures. For a lasting repair, replace the wire tie with a proper bolt or spring clip.
Is it safe to use rust penetrant on heat shield bolts?
Yes, rust penetrant is safe and highly recommended for loosening seized heat shield bolts. Spray it on the bolt and wait 10-15 minutes before trying to remove it. This prevents the bolt from snapping and makes the repair much easier. Just wipe away any excess penetrant before tightening the bolt back up.
How often should I inspect my heat shields?
A visual inspection every 6 months or 6,000 miles is a good practice. If you frequently drive on rough roads or in areas with heavy salt use, check them more often. Catching a loose shield early takes only a few minutes and prevents the need for more extensive repairs later.