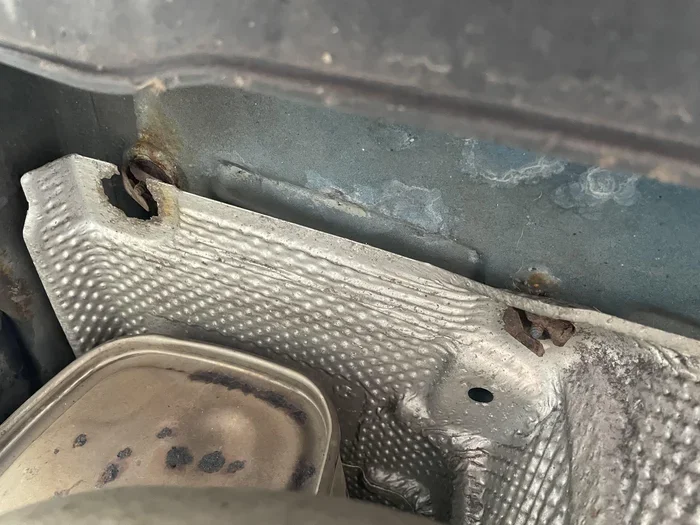
How Do You Tighten a Loose Heat Shield on Your Vehicle
A loose heat shield can cause annoying rattles and even dangerous heat exposure. This guide shows you how to tighten a loose heat shield using simple tools and a few easy steps. You’ll learn when to repair and when to replace, plus tips to prevent future problems.
A rattling noise under your car can drive you crazy. It might be a loose heat shield. Learning how to tighten a loose heat shield is a simple fix that saves you money and keeps your car safe. A heat shield protects your vehicle from extreme heat. When it becomes loose, it can vibrate, rattle, and even touch hot exhaust parts. This guide walks you through the entire process. You’ll learn what tools you need, how to locate the problem, and step-by-step instructions. I’ll also share tips to prevent future issues. By the end, you’ll know exactly how to fix a loose heat shield on your own.
A loose heat shield isn’t just annoying. It can also be dangerous. A rattling heat shield might indicate a bigger problem. In this article, I’ll show you how to tighten exhaust heat shield bolts the right way. We’ll cover common causes, tools, and when to call a professional. Let’s get started.
Key Takeaways
- Safety First: Always let the engine cool before touching the heat shield to avoid burns.
- Simple Tools: A wrench, wire brush, and anti-seize compound are all you need for most fixes.
- Check for Rust: If the shield is badly rusted, tightening won’t help—replacement is the better option.
- Prevent Rattles: Use stainless steel fasteners and apply anti-seize to stop future loosening.
- Know When to Call a Pro: If the heat shield is damaged or you can’t reach the bolts safely, a mechanic can help.
- Regular Inspections: Check your heat shield every oil change to catch loose bolts early.
📑 Table of Contents
Why a Loose Heat Shield Is a Problem
Your car has several heat shields. They protect plastic, fuel lines, and wiring from exhaust heat. When one becomes loose, it can touch the hot exhaust pipe. This can melt plastic parts or start a fire. A rattling heat shield also ruins your driving comfort. The noise can be loud and constant.
The Dangers of a Rattling Heat Shield
A loose heat shield can touch the exhaust manifold. This creates a burning smell. You might see smoke under the car. In worst cases, it can start a fire. Melting plastic can also clog your exhaust. This leads to expensive repairs. A heat shield rattles when the bolts wear out. Road vibration breaks down rubber grommets over time. Ignoring the problem makes it worse.
Common Causes of a Loose Heat Shield
Several things cause a car heat shield loose. Rust is the biggest enemy. Salt and moisture eat through metal. Vibration from the engine loosens bolts. A bad bump or pothole can bend the shield. Worn rubber isolators let the shield move. Cheap factory bolts can also snap. Here are the main causes:
- Rust and corrosion – Weakens the metal and bolts.
- Vibration fatigue – Constant engine rumble wears out fasteners.
- Impact damage – Hitting a curb or debris bends the shield.
- Broken rubber grommets – These dampen vibration. When they fail, the shield rattles.
- Stripped bolt holes – The threads get damaged and can’t hold tight.
Tools You’ll Need to Tighten a Heat Shield
You don’t need many tools to fix a loose heat shield. Most of what you need is already in your garage. I’ll list everything you should gather before you start.
Essential Hand Tools
- Socket wrench set – For heat shield bolts.
- Ratchet and extensions – Helps reach tight spots.
- Penetrating oil – Like PB Blaster for stuck bolts.
- Wire brush – Cleans rust from bolt holes.
- Rust remover spray – Helps free seized fasteners.
- New heat shield bolts – Always keep spares on hand.
Safety Gear and Extras
- Safety glasses – Protects your eyes from debris.
- Work gloves – Keeps hands safe from sharp metal.
- Jack and jack stands – Or use a ramp.
- Anti-seize compound – Prevents future rust and seizing.
- Stainless steel heat shield fasteners – These last much longer than regular steel.
- Heat shield clamp – Useful for securing loose edges.
Having everything ready makes the job faster. You won’t have to stop halfway to find a tool.
How to Tighten a Loose Heat Shield on Your Vehicle
Now for the main part. I’ll walk you through each step clearly. Follow them in order for the best results.
Locate the Loose Heat Shield
Start by parking on a flat surface. Let the engine cool completely. Then crawl under the car. Look for the shiny metal shield near the exhaust. You’ll often see it attached to the exhaust manifold or mid-pipe. A loose shield will have visible gaps. It might hang lower than the others. Listen for the rattle while a friend revs the engine lightly. This helps you pinpoint the exact spot.
Remove Rust and Debris
Use your wire brush to clean the bolt areas. Rust builds up around heat shield bolts. It can lock them in place. Spray penetrating oil on each bolt. Let it sit for 10 minutes. This breaks down corrosion. Use the wire brush again to scrub the bolt heads. Clean the surrounding metal too. You need a solid surface to re-tighten properly.
Reinstall and Tighten Fasteners
Now you can work on the heat shield itself. If the shield is too rusted to move, you might need to remove it first. Take off the old heat shield bolts carefully. Inspect them for damage. Replace any that are stripped. Clean the bolt holes with a wire brush. Apply a little anti-seize to new bolts. This makes future removal easier. Reattach the heat shield. Tighten each bolt in a crisscross pattern. This ensures even pressure. Don’t overtighten. You can snap the threads in thin metal.
If the rubber grommets are worn, replace them. They cushion the shield and reduce vibration. A heat shield clamp can add extra security. Wrap it around the shield and exhaust pipe. Tighten it snugly but not too tight.
Test for Rattles
Once everything is tight, start the engine. Listen carefully under the car. Ask a friend to rev the engine while you check. If the rattle is gone, you’ve succeeded. Take the car for a short test drive. Pay attention to any new sounds. If you still hear a noise, check the bolts again. Sometimes a second pass is needed. You can also use a hose clamp as a temporary fix to dampen vibration.
When to Replace Instead of Tighten
Tightening works great for loose bolts. But sometimes the heat shield itself is the problem. You need to know the difference. A repair vs. replace decision depends on a few factors.
Signs Your Heat Shield Is Beyond Repair
Look for holes in the metal. Rust that eats through the shield means it’s done. A bent shield can’t be fixed by tightening. If the bracket is broken, the shield will keep moving. Here are clear signs you need a new one:
- Visible holes or cracks in the metal.
- Severe rust that makes the shield flaky.
- Broken bracket that can’t be re-welded easily.
- Stripped bolt holes that won’t hold new bolts.
- Melting or warping from constant heat exposure.
Cost Considerations
Fixing a loose heat shield is cheap. You might only pay for new bolts. A heat shield repair cost is often under $20 if you do it yourself. At a shop, you might pay $50 to $100 for labor. Replacing the entire shield costs more. The heat shield replacement cost ranges from $50 for parts to $200 or more. This includes dealer pricing. DIY replacement saves a lot of money. You just need to match the right part for your vehicle.
| Factor | Repair (Tighten) | Replace |
|---|---|---|
| Cost | $0–$20 (DIY) / $50–$100 (shop) | $50–$200+ (parts) plus labor |
| Time | 20–45 minutes | 1–2 hours |
| Durability | Good if metal is solid | Lasts years with new parts |
| Safety | Safe if bracket is intact | Safe if shield is holed or rusted |
| Best For | Loose bolts, minor rust, rattling | Holes, severe corrosion, broken brackets |
Use this table to decide quickly. If the shield metal is strong, tighten it. If it’s falling apart, replace it.
Preventing Future Heat Shield Problems
Once you’ve fixed the rattle, you want to keep it fixed. A few simple habits will extend the life of your exhaust system heat shield.
Regular Inspection Tips
Make a habit of checking your heat shield. Do this every time you change your oil. Look for any new gaps or rust spots. Wiggle the shield gently with your hand. If it moves more than a millimeter, tighten it right away. Catching a loose heat shield early prevents bigger damage. I also recommend cleaning the shield with a wire brush once a year. This removes road salt and grime that cause rust.
Using Anti-Seize Compound
When you install new bolts, always use anti-seize compound. This mixture prevents metal from fusing together. It also stops corrosion. Apply a thin layer to the bolt threads. Use stainless steel heat shield bolts whenever possible. They resist rust far better than regular steel. A small tube of anti-seize costs a few dollars. It saves you hours of struggling with stuck bolts later.
Another tip is to avoid driving over speed bumps too fast. Impact damage is a common cause of loose heat shields. Slow down and take bumps gently. This protects the entire exhaust system.
Expert Tips for a Quiet Ride
Even after tightening, some vibration can remain. I’ve gathered a few tricks to make your ride quieter.
Vibration Dampening Tricks
Wrap the edge of the heat shield with exhaust tape. This adds a soft layer that absorbs vibration. You can also slip a rubber spacer between the shield and the bracket. This isolates the metal-to-metal contact. Some people use a small hose clamp as a makeshift damper. Wrap it around the shield where it contacts the pipe. This stops the buzzing noise. For a more permanent fix, apply heat shield adhesive. This sticky tape holds the shield firmly in place.
When to Call a Professional
Some jobs are better left to a mechanic. If you can’t reach the bolts safely, get help. A mechanic has lift equipment and special tools. If you smell gas or see smoke, stop immediately. These could signal a bigger exhaust leak. Also call a pro if the heat shield is severely corroded. They can weld a new bracket or replace the shield properly. A loose heat shield that touches the exhaust can cause a fire. Don’t take chances if you’re unsure.
Regular maintenance is the best way to avoid these problems. A quick check every few weeks keeps everything secure. You’ll enjoy a quiet, safe ride for miles to come.
Conclusion
Now you know exactly how to tighten a loose heat shield. It’s a job you can do in under an hour with basic tools. You learned to spot the dangers, gather the right equipment, and follow a clear step-by-step process. I showed you when to repair and when to replace. You also have tips to prevent future rattles. A quiet car is a happy car. Take a few minutes today to check your heat shield. It’s one of the easiest ways to keep your vehicle running safely. Grab your wrench and give it a try. You’ll be glad you did.
Frequently Asked Questions
Can I drive with a loose heat shield?
It’s not a good idea. A loose heat shield can touch the hot exhaust and cause a fire. It can also melt plastic parts underneath your car. If you must drive a short distance, go slowly and watch for smoke or burning smells.
How much does it cost to fix a loose heat shield?
If you do it yourself, the cost is very low—just a few dollars for new bolts and anti-seize compound. Taking it to a shop might cost $50 to $100 for labor. Replacing the entire shield is more expensive, ranging from $50 to $200 or more for parts.
What causes a heat shield to rattle?
The most common cause is loose bolts. Rust and vibration wear out the fasteners over time. Broken rubber grommets also let the shield move. Impact from potholes or curbs can bend the shield and create a rattling heat shield noise.
Do I need to replace the heat shield or just tighten it?
Tighten it if the bolts are loose and the metal is still solid. Replace it if you see holes, severe rust, or a broken bracket. A rusted heat shield can’t be saved by tightening alone.
What tools do I need to tighten a heat shield?
You need a socket wrench set, ratchet with extensions, penetrating oil, a wire brush, and new heat shield bolts. Anti-seize compound and a heat shield clamp are also very helpful. Safety glasses and gloves protect you during the job.
How often should I check my heat shield?
Inspect your heat shield every oil change or about every 5,000 miles. This helps you catch loose bolts early before they cause a rattling heat shield or more serious damage. A quick visual check takes only a few minutes.