Should New U-Joints Be Stiff Or Loose After Installation
New U-joints should feel snug but not stiff — they need a small amount of free movement to work correctly. A U-joint that is too tight can cause binding, vibration, and premature failure, while one that is too loose will wear out quickly and create dangerous driveline issues. This guide covers everything you need to know about the correct installation tightness, symptoms of improper fit, and step-by-step tips to get it right the first time.
This is a comprehensive guide about Should New U-Joints Be Stiff?.
Key Takeaways
- Correct Fit Matters: New U-joints should rotate smoothly with minimal resistance — not stiff, not wobbly.
- Stiff U-Joints Cause Damage: An over-tightened or binding U-joint puts stress on the driveshaft, transmission, and differential.
- Check for Excessive Play: A loose U-joint creates clunking noises and vibration, which can lead to costly repairs.
- Proper Installation Is Key: Correct bearing cap torque and grease fitting ensure long U-joint life.
- Know the Warning Signs: Vibration, clicking, and driveline noise are red flags that your U-joint may be installed incorrectly.
- Replace in Pairs: Always replace both U-joints on a driveshaft at the same time for balanced performance.
- Test Before Driving: Spin the driveshaft by hand after installation to confirm smooth, free movement.
[FEATURED_IMAGE_PLACEHOLDER]
When you are working on your vehicle’s drivetrain, few details matter as much as how your U-joints feel after installation. A new U-joint that is too tight can cause all kinds of problems, from annoying vibration to serious drivetrain damage. But a U-joint that is too loose is just as bad. So the big question is, should new U-joints be stiff or loose after installation?
The short answer is neither extreme. A properly installed U-joint should rotate smoothly with a natural, free feel. It should not bind or feel tight, but it also should not have excessive wobble or play. Getting this balance right is critical for the health of your entire driveline system. In this article, we will walk through everything you need to know about U-joint tightness, why it matters, and how to make sure your replacement U-joint is set up correctly.
What Does a U-Joint Do and Why Tightness Matters
A U-joint, short for universal joint, connects two rotating shafts at an angle. It allows your driveshaft to transmit power from the transmission to the rear axle while accommodating suspension movement. This small but mighty component handles a lot of stress every time you drive.
The tightness of a U-joint directly affects how smoothly power transfers through the drivetrain. If the joint is too stiff, it creates resistance that travels all the way back through the system. If it is too loose, it allows unwanted movement that causes vibration and wear. Understanding this balance is the first step toward a successful repair.
How U-Joints Transfer Torque
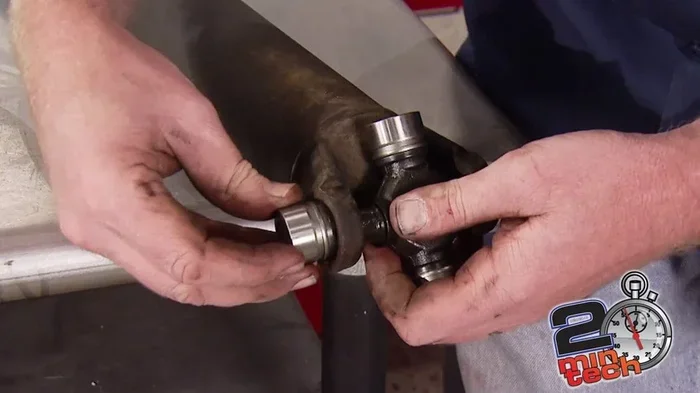
Every time you press the gas pedal, torque travels from the engine through the transmission, into the driveshaft, and out through the U-joints to the differential. The U-joint makes this possible even when the shaft is not perfectly aligned. Inside each joint, a cross-shaped hub holds four bearing caps that allow the shaft to pivot. These bearing caps rely on needle bearings and grease to rotate freely.
When a U-joint is installed too tightly, the bearing caps cannot move as designed. The needle bearings get compressed, and the joint binds. This binding creates heat, increases friction, and accelerates wear on every component connected to the driveshaft. Over time, this can lead to U-joint failure that leaves you stranded.
Why the Right Amount of Play Is Critical
A small amount of play in a U-joint is normal and expected. This play allows the joint to flex as the suspension moves up and down over bumps and uneven terrain. Without this flexibility, the driveshaft cannot compensate for changing angles, and stress builds up in the shaft, the transmission output shaft, and the axle input shaft.
However, there is a fine line between healthy play and excessive looseness. If you can grab the driveshaft and feel a noticeable clunk or wobble when you twist it by hand, the U-joint has too much free movement. This usually means the bearing caps are worn out or the joint was not properly pressed in during installation.
Should New U-Joints Feel Stiff After Installation
This is the most common question mechanics and DIYers ask when replacing U-joints. The answer is a clear no. New U-joints should never feel stiff or binding. If your new U-joint feels tight or you have to force it to rotate, something is wrong.
Signs Your New U-Joint Is Too Stiff
Identifying a stiff U-joint is relatively straightforward once you know what to look for. Here are the most common symptoms:
- Difficulty rotating the driveshaft by hand after installation
- Vibration at highway speeds that was not present before the repair
- Grinding or catching sensation when the driveshaft rotates
- Heat buildup around the U-joint after driving for extended periods
- Premature wear on the slip yoke or splines
When a U-joint is stiff, it usually means the bearing caps were over-pressed during installation. This compresses the needle bearings inside the cross, creating friction that the joint was never designed to handle. In some cases, the issue is a manufacturing defect where the cross is slightly oversized. Either way, a stiff U-joint needs to be replaced immediately.
What Causes Stiffness in a New U-Joint
Several factors can cause a replacement U-joint to feel stiff right out of the box. The most common culprits include:
- Over-pressing the bearing caps: Using a press that applies too much force can deform the cross and compress the needle bearings.
- Dirty or damaged needle bearings: If the needle bearings inside the cross are contaminated or misaligned, the joint will not rotate freely.
- Incorrect U-joint size: Using a U-joint that is slightly too large for the application creates interference fit that leads to binding.
- Greasing issues: A U-joint that has not been properly greased will feel stiff because there is not enough lubrication for the needle bearings to move smoothly.
- Cross and bearing mismatch: Some aftermarket U-joints use slightly different tolerances than OEM parts, which can result in a tighter fit.
The good news is that stiffness in a new U-joint is almost always fixable. You just need to identify the root cause and correct it before driving the vehicle.
Should New U-Joints Be Loose After Installation
On the opposite end of the spectrum, a U-joint that feels loose or has excessive play is also a problem. While some movement is normal, too much free play indicates a worn or improperly installed joint.
How to Check for Excessive Play
Testing a U-joint for looseness is simple and requires no special tools. Follow these steps:
- Jack up the rear of the vehicle and secure it on jack stands.
- Grab the driveshaft at the U-joint with both hands.
- Try to rotate the shaft back and forth while feeling for any clunking or excessive movement.
- Check the bearing caps for any visible wobble or gaps.
- Look for grease leaks around the seal areas of the bearing caps.
If you feel a noticeable clunk or if the shaft moves more than a few degrees in either direction, the U-joint has excessive play. This is a sign that the bearing caps are worn or that the joint was not properly installed.
Dangers of a Loose U-Joint
A loose U-joint might seem like a minor issue, but it can lead to serious problems if left unaddressed. The excessive movement causes the driveshaft to operate at inconsistent angles, which creates vibration. Over time, this vibration damages the transmission output shaft, the differential ring and pinion, and even the center bearing on two-piece driveshafts.
In worst-case scenarios, a loose U-joint can completely separate from the driveshaft while driving. This is extremely dangerous and can cause loss of vehicle control. If you notice any clunking or excessive movement in your U-joints, get the vehicle inspected immediately.
The Correct Feel of a Properly Installed U-Joint
So what should a new U-joint actually feel like after installation? The answer is smooth, free rotation with minimal resistance and no play.
What to Expect When Testing a New U-Joint
After you install a new U-joint and before you lower the vehicle, grab the driveshaft and give it a slow spin by hand. You should feel the shaft rotate smoothly and evenly. There should be no catching, no grinding, and no noticeable resistance. The joint should feel almost effortless to turn.
A properly installed U-joint also has a small amount of give when you twist the driveshaft side to side. This is the normal angular play that allows the joint to accommodate suspension movement. It should feel like a smooth, cushioned movement — not loose or sloppy.
Quick Tips for Verifying Correct Installation
- Spin the driveshaft by hand before lowering the vehicle and listen for any unusual sounds.
- Check the grease fitting on the U-joint and make sure it is facing upward for easy access.
- Verify the bearing cap torque matches the manufacturer specifications.
- Inspect the slip yoke for any damage or excessive wear before reinstalling the driveshaft.
- Make sure the U-joint is fully seated in the yoke ears on both sides.
Common Mistakes That Lead to Incorrect Tightness
Many installation problems come down to simple mistakes that are easy to avoid. Here are the most common ones:
- Not greasing the U-joint before installation: Dry needle bearings create friction and can cause the joint to feel stiff or even seize up.
- Using the wrong size press: A press that is too large or too small can damage the cross and bearing caps during installation.
- Forcing the bearing caps into place: If the caps do not slide on easily, stop and check for debris, damaged needle bearings, or a mismatched part.
- Skipping the snap ring or retaining clip: Without the proper retention, the bearing caps can shift and create uneven wear.
- Reusing old grease fittings: A damaged or clogged grease fitting prevents proper lubrication and shortens U-joint life.
Taking your time and following the manufacturer’s installation instructions will help you avoid all of these common pitfalls.
How to Properly Install a New U-Joint
Getting the installation right is just as important as choosing the correct U-joint. A perfect U-joint installed incorrectly will still cause problems.
Tools You Will Need
- U-joint press or vise
- Snap ring pliers
- Grease gun with compatible grease
- Torque wrench
- Needle bearing installation tool (optional but helpful)
- Safety glasses and gloves
Step-by-Step Installation Process
- Remove the old U-joint: Use a U-joint press or a vise to carefully remove the bearing caps from the old cross. Work slowly and evenly to avoid damaging the yoke ears.
- Inspect the yoke ears: Before installing the new U-joint, check the yoke ears for cracks, wear, or damage. Damaged yokes can cause even a new U-joint to fail prematurely.
- Press in the bearing caps: Using the U-joint press, carefully press each bearing cap onto the cross. Apply even pressure and stop if you feel excessive resistance.
- Install snap rings: Place the snap rings or retaining clips on both sides of each bearing cap. Make sure they are fully seated in the grooves.
- Grease the U-joint: Apply fresh grease to the grease fitting and work it into the joint by rotating the shaft. You should see grease squeeze out around the bearing caps.
- Reinstall the driveshaft: Carefully slide the driveshaft back into place and bolt all flanges securely.
- Test by hand: Before lowering the vehicle, spin the driveshaft and check for smooth, free movement with no binding or excessive play.
Bearing Cap Torque Specifications
Each U-joint manufacturer specifies a different torque for the bearing caps. Always check the part packaging or the service manual for the correct specification. Over-tightening the bearing caps is one of the most common causes of a stiff U-joint after installation.
When to Replace U-Joints and How Often
U-joints do not last forever, and knowing when to replace them can save you from a costly breakdown. Most U-joints have a lifespan of 50,000 to 100,000 miles, but this varies based on driving conditions, vehicle use, and maintenance habits.
Signs Your U-Joints Need Replacement
- Vibration that increases with speed: This is often the first sign of a worn U-joint.
- Clunking noises when shifting between drive and reverse: Excessive play causes the driveshaft to knock when torque changes direction.
- Squeaking or clicking noises: Dry or failing needle bearings create noise during rotation.
- Visible grease leaks around the U-joint: A failed seal allows grease to escape and contaminants to enter.
- Driveshaft angle changes: A worn U-joint allows the driveshaft to shift position under load.
Tips for Extending U-Joint Life
Regular maintenance goes a long way toward keeping your U-joints in good shape. Here are some tips:
- Grease your U-joints regularly: If your vehicle has grease fittings on the U-joints, lubricate them every time you change your oil.
- Check driveshaft angles: Make sure the driveshaft is installed at the correct angle to prevent uneven wear on the bearing caps.
- Replace U-joints in pairs: Always replace both U-joints on a driveshaft at the same time, even if only one appears worn. This ensures balanced operation.
- Use quality replacement parts: OEM or high-quality aftermarket U-joints last longer and perform better than cheap alternatives.
Expert Insights on U-Joint Installation
Experienced drivetrain specialists agree that the most important factor in U-joint longevity is correct installation. A premium U-joint that is installed incorrectly will fail faster than a budget part that is installed properly. The key is to focus on the process, not just the product.
Many professional mechanics also recommend inspecting the entire driveshaft assembly when replacing U-joints. This includes checking the center bearing on two-piece driveshafts, inspecting the slip yoke for worn splines, and verifying that the flange bolts are torqued to spec. Catching other issues during a U-joint replacement can prevent repeat repairs and save significant time and money.
One of the most overlooked aspects of U-joint installation is the grease fitting. A clogged or missing grease fitting means the joint cannot be properly lubricated after installation. Always make sure the grease fitting is clear and accessible before finalizing the install.
Another expert tip is to test the vehicle on a safe, open road shortly after installation. Pay attention to any new vibrations, noises, or feelings in the drivetrain. Catching an improperly installed U-joint early can prevent more serious damage to the transmission or differential.
Key Takeaways
- Correct Fit Matters: New U-joints should rotate smoothly with minimal resistance — not stiff, not wobbly.
- Stiff U-Joints Cause Damage: An over-tightened or binding U-joint puts stress on the driveshaft, transmission, and differential.
- Check for Excessive Play: A loose U-joint creates clunking noises and vibration, which can lead to costly repairs.
- Proper Installation Is Key: Correct bearing cap torque and grease fitting ensure long U-joint life.
- Know the Warning Signs: Vibration, clicking, and driveline noise are red flags that your U-joint may be installed incorrectly.
- Replace in Pairs: Always replace both U-joints on a driveshaft at the same time for balanced performance.
- Test Before Driving: Spin the driveshaft by hand after installation to confirm smooth, free movement.
Conclusion
The answer to should new U-joints be stiff is a definitive no. New U-joints should feel smooth, free, and natural when you rotate the driveshaft by hand. They should not bind, feel tight, or create resistance. At the same time, they should not be loose or have excessive play that causes clunking and vibration.
Getting the right balance is all about careful installation, proper lubrication, and using quality replacement parts. When you take your time and follow the correct procedure, your new U-joint will provide reliable service for tens of thousands of miles. The drivetrain is one of the most important systems in your vehicle, and the U-joints are a small but critical part of keeping it running smoothly.
Whether you are a seasoned mechanic or a DIYer tackling your first drivetrain repair, understanding how a U-joint should feel after installation gives you the confidence to get the job done right. Trust your hands, follow the steps outlined in this guide, and always test the drivetrain before hitting the road. Your vehicle will thank you with smooth, vibration-free operation for years to come.
Should New U-Joints Be Stiff Or Loose After Installation?
Neither. New U-joints should feel smooth and free-rotating with minimal resistance and no excessive play. A properly installed U-joint rotates effortlessly when you spin the driveshaft by hand.
Can a Stiff U-Joint Damage the Transmission?
Yes. A stiff U-joint creates resistance that travels through the driveshaft and into the transmission output shaft. Over time, this extra stress can damage the transmission internals and the differential.
How Do I Know if My U-Joint Has Too Much Play?
Grab the driveshaft and try to rotate it back and forth by hand. If you feel a noticeable clunk or if the shaft moves more than a few degrees in either direction, the U-joint has excessive play and needs to be replaced.
Should I Grease My New U-Joint Before Installation?
Absolutely. Greasing the U-joint before installation ensures that the needle bearings inside the cross are properly lubricated from the start. This reduces friction and helps the joint rotate smoothly right out of the box.
How Often Should I Replace My U-Joints?
Most U-joints last between 50,000 and 100,000 miles, depending on driving conditions and maintenance. If you notice vibration, clunking, or squeaking, have the U-joints inspected right away.
Is It Better to Replace Both U-Joints at Once?
Yes. Always replace both U-joints on a driveshaft at the same time. Replacing only one can create an imbalance that causes vibration and uneven wear on the new joint.
Frequently Asked Questions
What is Should New U-Joints Be Stiff??
Should New U-Joints Be Stiff? is an important topic with many practical applications.