How Do I Empty The Coolant Reservoir?
Emptying your coolant reservoir is a simple maintenance task that protects your engine from overheating and costly damage. Whether you are flushing old coolant, replacing contaminated fluid, or preparing for a repair, knowing the right steps makes all the difference. This guide covers everything you need to do the job safely and correctly at home.
Your car’s cooling system works hard every time you turn the key. It keeps your engine from running too hot, which can cause serious damage. The coolant reservoir plays a big role in this process. It stores extra coolant and lets the system breathe as temperatures change. But over time, old coolant breaks down, gets contaminated, or just needs to be replaced. That means you need to know how to empty the coolant reservoir properly.
Maybe you are flushing the system for the first time. Or perhaps your coolant level has been acting strange and you want to start fresh. Whatever the reason, emptying the reservoir is not as scary as it sounds. With the right tools and a little patience, you can do this in under an hour. This guide will walk you through every single step. You will learn what tools you need, how to stay safe, and what to do with the old fluid when you are done.
Let us be real for a second. Car maintenance can feel overwhelming. There are so many fluids, so many parts, and so many things that could go wrong. But emptying the coolant reservoir is one of the simpler jobs you can tackle. It does not require a mechanics degree or expensive equipment. You just need some basic knowledge and a willingness to get your hands a little dirty. By the end of this article, you will feel confident enough to handle this task on your own.
Key Takeaways
- Safety comes first: Always let your engine cool completely before touching any part of the cooling system.
- Gather your tools: Having the right wrenches, drain pan, and gloves saves time and prevents mistakes.
- Dispose properly: Old coolant is toxic and must be taken to a recycling center, not poured down the drain.
- Know your vehicle: Different cars have different reservoir designs, so check your owner manual before starting.
- Refill carefully: After emptying, bleed the system to remove air pockets that can cause overheating.
- Timing is key: Work on a cold engine and level ground for the safest and easiest process.
📑 Table of Contents
- What Is a Coolant Reservoir and Why Does It Matter?
- When Should You Empty the Coolant Reservoir?
- Tools and Safety Precautions You Need
- Step-by-Step Guide to Emptying the Coolant Reservoir
- How to Properly Dispose of Old Coolant
- Refilling and Bleeding the Cooling System After Emptying
- Common Mistakes to Avoid When Emptying the Coolant Reservoir
- Expert Insights on Coolant Reservoir Maintenance
- Frequently Asked Questions
What Is a Coolant Reservoir and Why Does It Matter?
Understanding Your Cooling System
Before you start draining anything, it helps to understand what the coolant reservoir does. Your engine generates a lot of heat when it runs. The cooling system circulates engine coolant (also called antifreeze) through passages in the engine block. This fluid absorbs heat and carries it away to the radiator, where it cools down. Then the cycle starts again.
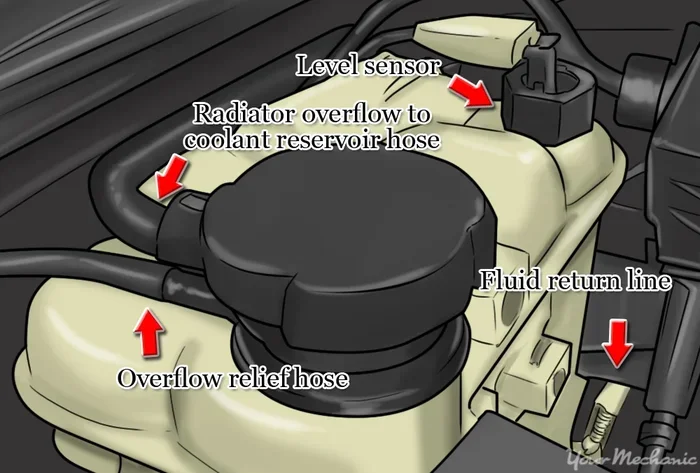
The coolant reservoir is a small plastic tank connected to the radiator by a hose. It acts as an overflow tank. When your engine heats up, coolant expands and flows into the reservoir. When the engine cools down, the fluid contracts and gets pulled back into the system. This constant movement keeps the coolant level stable and prevents pressure from building up.
If your coolant reservoir is full of old or contaminated fluid, it cannot do its job well. Dirty coolant loses its ability to transfer heat. It can also become acidic and damage hoses, seals, and even the radiator itself. That is why emptying and replacing the fluid is such an important part of cooling system maintenance.
Signs Your Coolant Reservoir Needs Attention
How do you know it is time to empty the coolant reservoir? Watch for these warning signs:
- The coolant level drops frequently even after refilling.
- The fluid looks rusty, oily, or has particles floating in it.
- You notice a sweet smell coming from under the hood.
- Your engine runs hotter than normal.
- The coolant warning light on your dashboard comes on.
- You see green, orange, or pink puddles under your parked car.
If you notice any of these signs, do not ignore them. A problem with your coolant reservoir can lead to engine overheating. And as we discussed, overheating can cause serious engine damage. If your car has ever overheated, you know how stressful that can be. In cold weather, a failing cooling system can also cause problems. In fact, can a car overheat in the winter? Yes, it absolutely can, especially if the coolant is old or contaminated.
When Should You Empty the Coolant Reservoir?
Recommended Maintenance Intervals
Most car manufacturers recommend flushing the entire cooling system every 30,000 to 50,000 miles. But that is just a general guideline. The right timing depends on several factors:
- Your vehicle type: Some cars need coolant changes more often than others. Check your owner manual for the manufacturer’s recommendation.
- Your driving conditions: If you drive in hot weather, stop-and-go traffic, or tow heavy loads, your cooling system works harder. You may need to flush more often.
- The condition of the current coolant: If the fluid looks dirty or smells bad, do not wait for the mileage marker.
- Recent repairs: If you have replaced any cooling system parts, flushing the reservoir ensures no contaminants enter the new components.
Situations That Require Immediate Draining
Sometimes you do not have a choice. You need to empty the coolant reservoir right away. Here are situations where immediate action is necessary:
- You have a coolant leak that you need to locate and repair.
- You are replacing the radiator or water pump.
- The coolant has become contaminated with oil or transmission fluid.
- You are switching to a different type of coolant, which requires a full flush to avoid chemical reactions.
Ignoring these situations can lead to bigger problems. For instance, driving with low or dirty coolant can cause your engine to overheat. If that happens, you might wonder, can I drive my car after it overheats? The short answer is: only very carefully and for a short distance. But it is much better to prevent overheating in the first place by keeping your coolant reservoir clean and full.
Tools and Safety Precautions You Need
What to Gather Before You Start
Having the right tools makes the job much easier. Here is what you will need:
- A drain pan (at least 2 gallons in capacity)
- A socket wrench set or the correct size wrench for your drain plug
- A funnel for refilling
- A clean rag or shop towels
- New coolant (the type specified in your owner manual)
- Distilled water (if mixing your own coolant)
- Rubber gloves and safety glasses
- A jack and jack stands (if the drain plug is underneath the car)
You do not need anything fancy. Most of these items are available at any auto parts store for just a few dollars. If you want to make the job even easier, consider getting a coolant extractor pump. This tool lets you suck the old fluid out through the reservoir neck without having to crawl under the car.
Safety First
Safety should always come first when working on your car. Here are some important precautions:
- Never work on a hot engine. The cooling system is pressurized, and hot coolant can spray out and cause burns. Wait at least 2 to 3 hours after driving, or let the car sit overnight.
- Wear gloves and eye protection. Engine coolant is toxic and can irritate your skin and eyes.
- Work on a level surface. This ensures the fluid drains properly and prevents the car from rolling.
- Keep pets and children away. Even a small amount of spilled coolant can be harmful to animals.
- Dispose of old coolant properly. More on that in the next section.
Some people also ask whether they can work on the system with the car on a slope. The answer is no. Always park on a flat surface. If you do not have a flat driveway, consider using ramps or finding a different location. This ensures the fluid drains completely and safely.
Step-by-Step Guide to Emptying the Coolant Reservoir
Step 1: Locate the Coolant Reservoir
Open the hood and look for a translucent plastic tank near the radiator. It usually has “MIN” and “MAX” lines on the side. The tank will have a cap on top, often labeled with a warning about hot coolant. In some vehicles, the reservoir is easy to spot. In others, it might be tucked behind a splash guard or near the firewall. If you are having trouble finding it, check your owner manual for the exact location.
Before you do anything, make sure the engine is completely cold. Touch the radiator hose gently to confirm. If it is even slightly warm, give it more time. Working on a hot system is dangerous and can result in burns.
Step 2: Prepare the Drain Area
Place your drain pan directly under the drain plug or the lowest point of the cooling system. If the coolant reservoir has a drain plug at the bottom, position the pan right below it. If there is no drain plug, you will need to disconnect the lower radiator hose to let the fluid out.
Have your rag ready to wipe up any spills. Old coolant can stain concrete and is toxic to plants and animals, so be prepared to clean up any drips immediately.
Step 3: Open the Radiator Cap First
This is a step many people skip, but it is important. Before you drain the system, open the radiator cap slowly. This releases any pressure in the cooling system. Press down on the cap with a thick rag and twist it counterclockwise. If you hear a hissing sound, wait for it to stop before removing the cap completely.
Releasing the pressure allows the coolant to drain faster and more completely. It also prevents a vacuum from forming that could make draining difficult later.
Step 4: Drain the Coolant
Now it is time to let the old fluid out. Here is what to do:
- If your reservoir has a drain plug, use your wrench to loosen it. Turn it counterclockwise and be ready for the fluid to start flowing.
- Let the coolant drain completely into the pan. This may take 10 to 15 minutes.
- If there is no drain plug, carefully disconnect the lower radiator hose. Use a wrench to loosen the clamp and gently pull the hose off.
- Allow all the fluid to flow out into the drain pan.
Once the fluid stops dripping, you are ready to move to the next step. At this point, some people also choose to flush the system with distilled water. This helps remove any remaining old coolant and debris. To do this, simply pour a gallon of distilled water into the radiator, let it drain out, and repeat until the water runs clear.
Step 5: Close the Drain and Reconnect Hoses
After the system is fully drained (and flushed if you chose to do so), it is time to close everything back up. Reinstall the drain plug and tighten it snugly. If you disconnected the lower radiator hose, reattach it and secure the clamp. Make sure everything is tight but do not overtighten, as you could crack the fittings.
Replace the radiator cap and the reservoir cap. Double-check that everything is in place before you move on to refilling.
How to Properly Dispose of Old Coolant
Why Proper Disposal Matters
Old engine coolant is highly toxic. It contains chemicals like ethylene glycol that are poisonous to humans and animals. Pouring it down the drain, onto the ground, or into the trash is illegal in most areas and incredibly harmful to the environment. Even a small amount can contaminate water supplies and kill wildlife.
How to Handle and Transport Old Coolant
Here is how to dispose of your old coolant the right way:
- Keep the old coolant in a sealed, labeled container. A clean milk jug or a dedicated coolant container works well.
- Do not mix old coolant with other fluids like oil or gasoline. Keep it separate.
- Take it to a local auto parts store, mechanic shop, or recycling center. Many of these places accept used coolant for free.
- Check with your local waste management authority for hazardous waste drop-off locations.
Some communities hold hazardous waste collection days where you can drop off old coolant and other toxic fluids. This is a great option if you do not have a recycling center nearby. Never leave old coolant containers in your garage or shed where children or pets can access them.
Refilling and Bleeding the Cooling System After Emptying
Mixing New Coolant
Before you refill the system, check your owner manual for the correct type of coolant. Some cars require a specific coolant mixture that is pre-mixed. Others need you to mix antifreeze with distilled water yourself. The most common ratio is 50/50, but this can vary by vehicle and climate.
If you live in an area with very cold winters, you might need a 60/40 mix (more antifreeze) to prevent the fluid from freezing. If you live in a hot climate, a 50/50 mix is usually sufficient. Never use plain water alone, as it does not provide the same protection against freezing and boiling.
Refilling the Reservoir
With the drain plug and hoses securely in place, you can now refill the system:
- Pour the new coolant mixture into the radiator slowly through the open cap.
- Fill the coolant reservoir to the “MAX” line.
- Replace the radiator cap tightly.
- Start the engine and let it idle for 10 to 15 minutes.
- Watch the temperature gauge to make sure it stays normal.
- Turn off the engine and let it cool down again.
- Check the coolant level in the reservoir and top off if needed.
Bleeding Air from the System
One of the most important steps many people skip is bleeding the cooling system. When you empty and refill the coolant reservoir, air bubbles can get trapped in the system. These air pockets prevent the coolant from circulating properly, which can cause hot spots in the engine and lead to overheating.
To bleed the system, look for a bleed valve on the radiator or engine block. Open it slightly while the engine is running and let air escape until you see a steady stream of coolant. Close the valve and recheck the coolant level after the engine has cooled.
Some vehicles have automatic bleeding systems and do not require manual bleeding. But if your car has a bleed valve, taking the extra few minutes to use it can save you from serious overheating problems later. If you ever notice your engine temperature climbing after a coolant service, air in the system is often the culprit.
Checking for Leaks After Refilling
Once you have refilled and bled the system, it is smart to check for leaks. Start the engine and let it run for a few minutes. Look under the car for any drips. Check the hoses, connections, and the reservoir itself. Wipe down any wet areas and watch them over the next few days. If you see new fluid, you may have a coolant leak that needs attention.
If you are unsure whether a leak is serious, it is always a good idea to have a professional take a look. Sometimes a small drip today can become a big problem tomorrow. Catching leaks early saves money and prevents engine damage.
Common Mistakes to Avoid When Emptying the Coolant Reservoir
Even simple jobs can go wrong if you are not careful. Here are the most common mistakes people make when emptying the coolant reservoir:
- Opening the system while the engine is hot. This is dangerous and can cause severe burns from pressurized hot coolant spraying out.
- Using the wrong type of coolant. Different coolants are not always compatible. Mixing them can cause chemical reactions that damage the system.
- Forgetting to bleed the system. Air pockets lead to overheating, which can warp engine components or crack the head gasket.
- Pouring old coolant down the drain. This is illegal and environmentally damaging. Always take it to a proper disposal site.
- Overfilling the reservoir. When the engine heats up, coolant expands. An overfilled reservoir can release excess fluid onto the engine and ground.
- Skipping the radiator cap step. Opening the drain plug without first releasing pressure can cause a mess and slow the draining process.
Avoiding these mistakes keeps you safe and ensures the job is done right. Take your time, follow the steps in order, and do not rush through the process.
Expert Insights on Coolant Reservoir Maintenance
Experienced mechanics often say that the coolant reservoir is one of the most overlooked parts of a car. People check their oil, rotate their tires, and change their air filters regularly. But they forget about the cooling system until something goes wrong. By that point, the damage can be expensive.
One common question mechanics hear is whether you can just top off the reservoir instead of doing a full flush. The answer depends on the condition of the current coolant. If the fluid is still clean and within its recommended service life, topping off is fine. But if the coolant is old, dirty, or has been in the system for too long, a full flush and refill is the better choice. Old coolant loses its protective properties over time and can actually accelerate corrosion inside the cooling system.
Another tip from experienced professionals: keep a record of when you last flushed your cooling system. This makes it much easier to track maintenance intervals and stay on top of your vehicle’s needs. A simple note in your phone or a sticker on the garage door can save you from forgetting this important service.
Frequently Asked Questions
Can I use a vacuum pump to extract old coolant from the reservoir?
Yes, a vacuum pump or coolant extractor is an excellent tool for this job. It lets you pull the old fluid out through the reservoir neck without crawling under the car. This method is faster and cleaner than draining through the petcock or lower hose. Many professional shops use this approach for coolant changes.
How long does it take to empty and refill the coolant reservoir?
For most vehicles, the entire process takes between 30 and 60 minutes. Draining the old coolant takes about 15 minutes. Flushing the system with water adds another 10 to 15 minutes. Refilling and bleeding the system takes the remaining time. If you are doing this for the first time, give yourself an extra 15 minutes to get comfortable with the process.
What color should my coolant be?
Healthy coolant is typically bright green, orange, pink, or blue depending on the type. If your coolant looks rusty, brown, or dark, it is time for a change. Discolored coolant is a sign of contamination or corrosion inside the cooling system. Dark coolant loses its ability to protect the engine and should be replaced promptly.
Can I mix different types of coolant?
It is best not to mix different types of coolant. They use different chemical formulations that can react poorly when combined. Mixing coolants can create a gel-like substance that clogs the cooling system and reduces its effectiveness. If you are unsure what type your car uses, check the owner manual or ask a professional at your local auto parts store.
Is it normal for the coolant level to drop slightly over time?
A very small drop in the coolant level over several months can be normal due to minor evaporation. However, a significant drop or frequent need to add coolant is not normal. It usually indicates a leak somewhere in the system. Address coolant loss early to prevent the engine from running low and potentially overheating.
Do I need to replace the radiator cap when I change the coolant?
It is a good idea to inspect the radiator cap when you are changing the coolant. The cap maintains pressure in the cooling system, and a worn cap can cause coolant to boil at a lower temperature or allow fluid to escape. If the cap looks corroded, cracked, or if the rubber seal is worn, replace it. Radiator caps are inexpensive and can prevent bigger cooling system problems.