Car Amp Wiring Kit The Easy Guide to Better Car Audio
A car amp wiring kit is the easiest way to upgrade your car audio and get clean power to your amplifier. This guide walks you through every step, from picking the right kit to finishing a professional install. You will learn about wire gauges, grounding, and common mistakes to avoid.
If you love music in your car, you already know that the factory stereo system rarely does it justice. The sound feels flat. The bass is weak. The highs sound harsh. A car amp wiring kit changes all of that. It gives your amplifier the clean power and solid connections it needs to sound amazing.
Setting up a car amplifier might sound intimidating. But with the right car amp wiring kit, it becomes a straightforward project. You do not need to be a mechanic or an audio engineer. You just need the right tools, a little patience, and this guide.
In this article, we will cover everything you need to know. We will talk about what a car amp wiring kit includes, how to choose the right one, and how to install it step by step. By the end, you will feel confident enough to do the job yourself. Let us get into it.
Key Takeaways
- Right Kit Matters: Choosing the correct car amp wiring kit prevents power loss and signal interference.
- Wire Gauge Is Critical: Thicker wires carry more power safely to your amplifier.
- Grounding Fixes Most Problems: A clean ground connection eliminates buzzing and static.
- Fuse Protection Is Non-Negotiable: Always use an inline fuse to protect your vehicle and equipment.
- RCA Cables Reduce Noise: Quality RCA cables keep your signal clean and free from interference.
- Installation Is Easier Than You Think: With the right kit and basic tools, anyone can install a car amplifier at home.
📑 Table of Contents
What Is a Car Amp Wiring Kit?
A car amp wiring kit is a collection of cables and hardware designed to connect your amplifier to your vehicle’s electrical system. Think of it as a complete toolkit for your amplifier installation. Instead of buying each cable separately, a kit gives you everything in one package.
Most kits include several essential components:
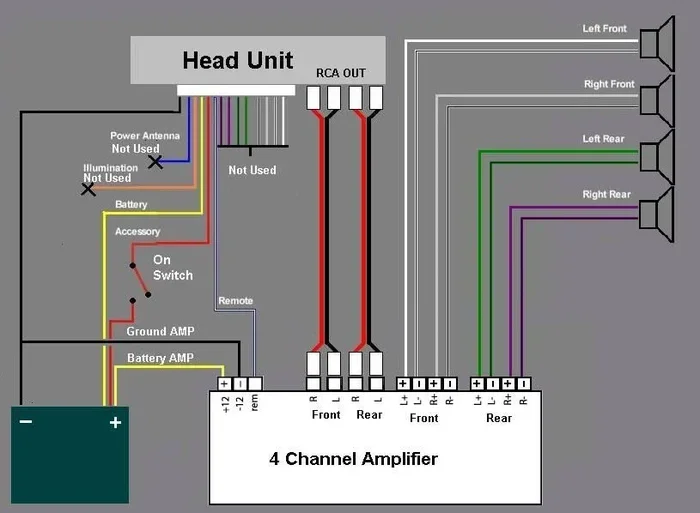
- Power wire – This cable carries electrical current from your battery to the amplifier. It comes in different gauges depending on how much power your amp needs.
- Ground wire – This wire connects the amplifier to a bare metal point on your car’s chassis. It completes the electrical circuit safely.
- Remote turn-on wire – This small wire tells your amplifier to turn on and off when you start your car.
- RCA cables – These carry the audio signal from your head unit to the amplifier.
- Speaker wire – This connects the amplifier to your speakers.
- Inline fuse – This protects your wiring and equipment from power surges.
- Fuse holder and connectors – These make the installation clean and secure.
Using a car amp wiring kit saves you time and money. You do not have to hunt down individual parts. And kits are designed to work together, which means fewer compatibility issues.
Why Buy a Complete Kit Instead of Individual Wires?
Some people prefer to buy cables one at a time. But a car amp wiring kit offers several advantages. First, everything is matched. The power wire, ground wire, and fuse holder all work together at the correct ratings. Second, kits often include bonus items like zip ties, connectors, and grommets. Third, buying a bundle is almost always cheaper than purchasing each item separately.
Also, kits make the job faster. You do not need to figure out which wire goes where. The package comes with clear instructions and all the parts labeled. This is especially helpful for beginners who have never done an amplifier install before.
How to Choose the Right Car Amp Wiring Kit
Not all car amp wiring kits are created equal. Your vehicle, your amplifier, and your audio goals all play a role in choosing the right one. Here is what you need to consider before you buy.
Match the Wire Gauge to Your Amplifier
The wire gauge is the thickness of the cable. Thicker wires have lower gauge numbers and can carry more electrical current safely. If you use a wire that is too thin for your amplifier, it can overheat. This creates a fire risk and can damage your equipment.
Here is a simple guide to wire gauge selection:
- 10-gauge wire: Best for amplifiers up to about 300 watts.
- 8-gauge wire: Good for amplifiers between 300 and 600 watts.
- 4-gauge wire: Ideal for amplifiers between 600 and 1000 watts.
- 2-gauge wire: Use for amplifiers over 1000 watts.
Always check your amplifier’s power rating before buying a car amp wiring kit. When in doubt, go one size thicker. It is better to have too much capacity than too little.
Consider Your Vehicle Type
The type of vehicle you drive matters too. A compact car has less space in the engine bay and a smaller battery than a full-size truck. If you drive a smaller vehicle, look for a kit with a shorter power wire. You may also need a thinner gauge if your factory electrical system is not very robust.
For trucks and SUVs, you usually have more room and a stronger electrical system. This gives you more flexibility in choosing wire gauge and routing options. Some kits are specifically designed for certain vehicle types, which makes installation even easier.
Look for Quality Materials
Not all wiring kits use the same materials. Cheap kits often use thin copper cladding or aluminum instead of pure copper. Pure copper wires conduct electricity better and last longer. Look for kits that clearly state they use oxygen-free copper (OFC) wiring.
The connectors and terminals matter too. Gold-plated connectors resist corrosion and provide a more reliable connection over time. A good car amp wiring kit will have quality connectors on every end, not just the power wire.
Check for Extra Accessories
Some kits come with extras that add real value. Look for kits that include:
- Cable ties for clean routing
- Rubber grommets for passing wires through firewalls
- Multiple RCA cables for multi-channel setups
- Pre-terminated connectors for easy speaker hookups
- A wiring diagram specific to popular vehicle models
These extras might seem small, but they make a big difference during installation. They save you from running to the hardware store mid-project and help you achieve a professional-looking result.
Step-by-Step Guide to Installing Your Car Amp Wiring Kit
Now let us walk through the actual installation process. Follow these steps carefully and you will have a clean, safe setup in no time. Remember to disconnect your battery before starting any work on your electrical system.
Step 1: Plan Your Wire Routing
Before you start cutting or drilling, plan where each wire will go. The power wire typically runs from the battery on one side of the car to the amplifier on the other side. The ground wire connects to a bare metal point near the amplifier. RCA cables usually run along the same side as the head unit, underneath the carpet.
Take a few minutes to visualize the route. Avoid running wires near heat sources like the exhaust. Also, keep power wires away from audio signal cables. This separation prevents electromagnetic interference that causes buzzing and hum in your system.
Step 2: Install the Power Wire
Start by running the power wire from the battery to the amplifier. Use a grommet or drill a small hole in the firewall to pass the wire into the cabin. Make sure the wire is not pinched or rubbing against sharp edges.
Connect the inline fuse as close to the battery as possible. This is the most important safety step. The fuse protects your wiring from short circuits. Use the fuse rating recommended for your wire gauge. For example, a 4-gauge wire typically uses a 60-amp fuse, while an 8-gauge wire uses a 40-amp fuse.
Run the power wire through the car to the amplifier location. Secure it with zip ties every 12 to 18 inches. This keeps the wire neat and prevents it from moving around while you drive.
Step 3: Connect the Ground Wire
The ground wire is just as important as the power wire. Find a bare metal spot on your car’s chassis near the amplifier. Scrape away any paint or rust to ensure a clean metal-to-metal connection.
Use a ring terminal on the ground wire and secure it with a bolt. Tighten it firmly. A loose ground connection is the number one cause of buzzing and poor sound quality. After connecting, apply a thin layer of dielectric grease to the terminal to prevent corrosion.
Keep the ground wire as short as possible. A shorter ground path provides better performance and reduces the chance of signal noise in your audio system.
Step 4: Connect the Remote Turn-On Wire
The remote turn-on wire is usually blue and white. It tells the amplifier when to power up. Find this wire in your vehicle’s wiring harness or tap into the accessory wire from your head unit.
Connect the remote wire to the corresponding wire on your amplifier. Use a quality butt connector or solder the joint and cover it with heat shrink tubing. This ensures a reliable connection that will not vibrate loose over time.
Step 5: Run the RCA Cables
RCA cables carry the audio signal from your head unit to the amplifier. Route them on the opposite side of the car from the power wire. This separation minimizes interference and keeps your audio signal clean.
Pass the RCA cables through the firewall and along the underside of the dashboard. Secure them with cable ties. Avoid running them near power windows, seat motors, or other sources of electromagnetic interference.
At the amplifier end, plug the RCA cables into the corresponding inputs. If your amplifier has multiple inputs, match left to left and right to right for proper stereo imaging.
Step 6: Connect the Speaker Wires
Now connect the speaker wires from the amplifier outputs to your speakers. Pay attention to polarity. The positive terminal on the amplifier should connect to the positive terminal on the speaker. Reversing polarity can cause phase issues that make your bass sound weak and your soundstage feel disjointed.
Use the appropriate speaker wire gauge for your setup. For most car audio applications, 16-gauge or 14-gauge speaker wire works well. Keep speaker wire runs as short as possible for the best performance.
Step 7: Double-Check Everything Before Powering Up
Before you reconnect your battery, go through every connection one more time. Check that the power wire fuse is in place. Verify that the ground connection is tight. Make sure the RCA cables are fully seated. Confirm that speaker wires are connected with correct polarity.
This final check takes only a few minutes but can save you from costly mistakes. A single loose connection can damage your amplifier or head unit the moment you apply power.
Common Mistakes to Avoid When Wiring Your Car Amp
Even with a great car amp wiring kit, mistakes can happen. Here are the most common errors people make during amplifier installation and how to avoid them.
Using the Wrong Wire Gauge
This is the most common mistake. People often choose a wire that is too thin for their amplifier’s power needs. Thin wires create resistance, which causes voltage drop. Voltage drop means your amplifier does not get the full power it needs. It also causes the wires to heat up, which is a serious safety hazard.
Always match the wire gauge to your amplifier’s maximum power output. When in doubt, go thicker. A thicker wire costs a little more but protects your entire system.
Poor Grounding
A bad ground connection causes more audio problems than almost anything else. If your ground wire touches paint, rust, or debris, you will get buzzing, humming, and distorted sound. Always scrape the mounting area down to bare metal and use a star washer for a solid connection.
Never ground your amplifier to the battery negative terminal. Always ground it to a point on the chassis near the amplifier. This provides the shortest and most direct path for the electrical current.
Running Power and Signal Wires Together
Running your power wire and RCA cables side by side is a recipe for noise. The electrical current in the power wire creates a magnetic field that induces a hum into your audio signal. Always route these wires on opposite sides of the vehicle.
If they must cross, do so at a 90-degree angle. This minimizes the amount of interference. Keeping power and signal wires separated is one of the simplest ways to get a clean, noise-free audio signal.
Forgetting the Inline Fuse
Some people skip the inline fuse to save a few minutes. This is a dangerous mistake. Without a fuse, a short circuit can cause a fire or destroy your amplifier. Always install the fuse as close to the battery positive terminal as possible.
Choose the correct fuse rating for your wire gauge. Using a fuse that is too large defeats the purpose. Using one that is too small will blow constantly and frustrate you. Match the fuse to the wire gauge and amplifier specifications.
Neglecting Cable Management
Loose wires rattle, vibrate, and can work loose over time. Always use zip ties to secure your cables along their routing path. Use rubber grommets where wires pass through holes in the firewall or body panels. This protects the wires from chafing and gives your installation a professional look.
Expert Tips for the Best Car Audio Wiring Setup
Once you have the basics down, these expert tips will take your installation to the next level. They come from years of experience in car audio installations and can make a real difference in sound quality and reliability.
Use Star Washers for Ground Connections
A star washer spreads the pressure of the bolt over a larger area. This creates a more reliable metal-to-metal contact. It also cuts through any remaining paint or corrosion that you might have missed during prep. This small addition costs pennies but makes a big difference in connection quality.
Add a Capacitor for Big Amplifiers
If your amplifier pushes more than 500 watts, consider adding a capacitor to your car amp wiring kit setup. A capacitor stores electrical energy and releases it quickly when your amplifier demands a burst of power. This prevents voltage drops that cause your lights to dim when the bass hits hard.
Capacitors are especially helpful in older vehicles or those with smaller alternators. They stabilize your electrical system and protect your amplifier from power-related damage.
Label Your Wires During Installation
This tip sounds simple, but it saves enormous headaches later. Use small pieces of tape or wire labels to mark each cable as you install it. Label the power wire, ground wire, remote wire, and each RCA cable. If you ever need to troubleshoot or modify your setup, you will thank yourself for taking those extra few minutes.
Upgrade Your Head Unit if Needed
A car amp wiring kit works best when paired with a quality head unit. If your factory head unit has poor preamp outputs, your amplifier will not sound its best. Consider upgrading to an aftermarket head unit with high-voltage preamp outputs. This gives your amplifier a stronger, cleaner signal to work with.
Many modern head units also offer built-in time alignment and EQ settings. These features let you fine-tune your sound without needing external processors. The combination of a good head unit and a proper wiring kit creates a truly impressive car audio experience.
How to Maintain Your Car Amp Wiring Kit Over Time
Your wiring job is not done once the installation is complete. Regular maintenance keeps your car audio system performing at its best for years to come.
Inspect Connections Every Six Months
Vibrations from driving can loosen connections over time. Every six months, visually inspect all your wire connections. Check that the power wire fuse is secure. Verify that the ground connection is still tight. Make sure RCA cables are not corroded or damaged.
If you notice any loose connections, tighten them immediately. A loose ground connection will slowly degrade your sound quality and can eventually cause equipment failure.
Keep Wires Clean and Protected
Dirt, moisture, and heat all damage wiring over time. Keep your wires clean and free from debris. If any wire insulation looks cracked or frayed, replace it immediately. Damaged insulation exposes bare copper, which creates short circuit risks.
Use protective conduit or loom in areas where wires are exposed to heat or moving parts. This small investment extends the life of your entire car audio system significantly.
Watch for Warning Signs
Your car audio system will tell you when something is wrong. Pay attention to these warning signs:
- Dimming headlights when the bass hits: This indicates your electrical system cannot supply enough power.
- Buzzing or humming from the speakers: This usually means a grounding problem or interference from power cables.
- Amplifier goes into protection mode: This suggests a wiring issue, low impedance, or overheating.
- Fuse blows repeatedly: This points to a short circuit somewhere in the wiring.
Catching these signs early prevents costly damage to your amplifier and other components. Address any issues promptly and your system will reward you with great sound for years.
Conclusion
A car amp wiring kit is the foundation of any great car audio system. It ensures your amplifier receives clean, consistent power and delivers its full potential through your speakers. Without the right wiring, even the most expensive amplifier will underperform.
We have covered everything from choosing the right wire gauge to avoiding common installation mistakes. You now have the knowledge to pick the perfect kit and install it with confidence. The process is simpler than most people expect, and the results are incredibly rewarding.
Take your time with the installation. Follow each step carefully. Double-check your connections before powering up. And remember that quality wiring pays off in sound quality, reliability, and safety. Your car audio upgrade deserves the best start, and a solid car amp wiring kit gives you exactly that.
Now that you have all the information you need, there is no reason to wait. Pick the right kit for your setup, gather your tools, and enjoy the process of building something great. Your ears will thank you every time you turn on the music.
Frequently Asked Questions
What size car amp wiring kit do I need for a 500-watt amplifier?
For a 500-watt amplifier, an 8-gauge car amp wiring kit is the standard choice. This gauge handles the current safely without excessive voltage drop. If your amplifier pushes close to 600 watts, consider stepping up to a 4-gauge kit for extra headroom and safety margin.
Can I use a car amp wiring kit in any vehicle?
Yes, car amp wiring kits work in cars, trucks, SUVs, and even vans. The main difference is the wire length and gauge you need. Smaller vehicles may require shorter power wires, while larger vehicles might benefit from thicker gauges. Always match the kit to your amplifier’s power rating and your vehicle’s electrical capacity.
How much does a good car amp wiring kit cost?
A quality car amp wiring kit typically costs between $40 and $150. Budget kits around $40 work well for smaller amplifiers. Mid-range kits between $70 and $120 offer better materials and more accessories. Premium kits above $150 include high-quality OFC wiring, premium connectors, and extra accessories for larger setups.
Do I need professional help to install a car amp wiring kit?
No, most people can install a car amp wiring kit themselves with basic tools and this guide. The process involves connecting a few wires and securing them properly. However, if you are uncomfortable working with your vehicle’s electrical system, a professional installer can complete the job quickly and safely.
What happens if I use a wire gauge that is too thin?
Using a wire gauge that is too thin creates resistance and causes voltage drop. This means your amplifier does not receive full power and your sound quality suffers. Thin wires also generate heat, which can melt insulation and create a fire hazard. Always choose a wire gauge that matches or exceeds your amplifier’s power requirements.
How long does a car amp wiring kit installation take?
A typical car amp wiring kit installation takes between one and three hours for most DIYers. First-time installers may take a bit longer while they learn the process. Experienced installers can often complete the job in under an hour. The key is to take your time and do each step carefully rather than rushing through.