How Do You Pop a Hood Without a Latch Step by Step
Knowing how to pop a hood without a latch is an essential skill every driver should have. Whether your hood latch is broken, frozen, or stuck, this guide walks you through multiple reliable methods to get your engine bay open safely. We cover emergency techniques, common causes, and prevention tips so you are never stranded with a closed hood.
Key Takeaways
- Multiple Methods Available: You can use the emergency release, cable pull, or prop rod technique to open a hood without a working latch.
- Safety Comes First: Always ensure the car is parked on a flat surface and the engine is cool before attempting any hood release.
- Common Causes Exist: Frozen latches, broken cables, and worn-out catches are the most frequent reasons a hood will not open normally.
- Prevention Is Simple: Regular maintenance, lubrication, and inspections can prevent most hood latch problems before they happen.
- Know Your Car: Different vehicles have different hood release mechanisms, so familiarizing yourself with your specific model helps in emergencies.
- Professional Help Is Always an Option: If DIY methods fail, a mechanic can quickly and safely resolve the issue.
📑 Table of Contents
- How Do You Pop a Hood Without a Latch Step by Step
- Why Hood Latches Fail: Understanding the Problem
- Method 1: Using the Emergency Hood Release
- Method 2: Manually Pulling the Hood Release Cable
- Method 3: Using the Prop Rod or Hood Support
- Method 4: Using a Flat Tool to Release the Latch from Outside
- Preventing Hood Latch Problems in the Future
- When to Call a Professional
- Final Thoughts
How Do You Pop a Hood Without a Latch Step by Step
There is nothing worse than arriving at your car, ready to check the engine, and realizing the hood will not open. A broken or stuck hood latch can leave you feeling helpless. But here is the good news. You do not need a professional mechanic on the spot to get the job done. With the right knowledge and a few basic tools, you can pop a hood without a latch in minutes.
This guide gives you a complete walkthrough of every method available. Whether you are dealing with a frozen latch in winter, a snapped release cable, or a worn-out hood catch, we have you covered. We also share prevention tips so this never becomes a recurring problem. Let us get into it.
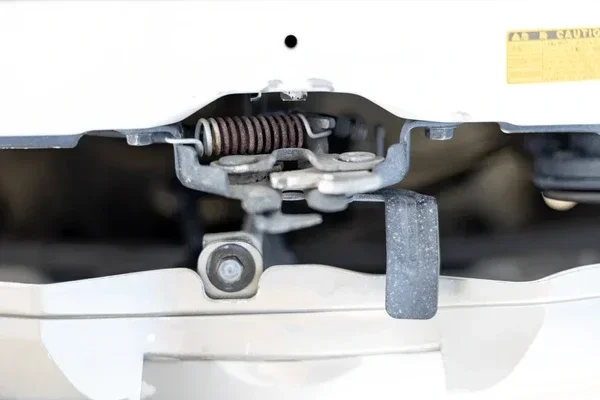
Before we dive into the steps, it helps to understand why hood latches fail in the first place. Most hood latch systems use a primary release handle inside the car and a secondary latch under the hood edge. When you pull the interior handle, it releases a cable that disengages the primary latch. Then you manually lift the hood and secure it with the prop rod or hydraulic support. When any part of this system breaks or freezes, the whole process stops working.
Understanding how the hood release mechanism works makes it much easier to troubleshoot. The hood latch is essentially a lever system held in place by a spring and a lock. Over time, rust, dirt, and cold weather can interfere with the moving parts. A broken hood release cable is another common culprit. And sometimes, the issue is as simple as a misaligned hood hinge. Whatever the cause, the solutions are straightforward once you know what to look for.
Now, let us walk through the step-by-step methods to open your hood when the latch is not working.
Why Hood Latches Fail: Understanding the Problem
Common Reasons Your Hood Will Not Open
Before jumping into the fix, it is worth understanding what went wrong. Here are the most common reasons a hood latch fails:
- Frozen latch mechanism: Moisture gets inside the latch and freezes during cold weather, locking everything in place.
- Broken hood release cable: The cable connecting the interior handle to the latch can snap or stretch over time.
- Worn-out hood catch: The plastic or metal catch that holds the hood down wears out and loses its grip.
- Rust and corrosion: Older vehicles are especially prone to rust buildup around the latch and hinge areas.
- Misaligned hood hinge: If the car has been in even a minor accident, the hinge alignment can shift, preventing proper release.
- Broken hood prop rod: Without a working prop rod, some people avoid opening the hood entirely, which leads to neglect.
- Electrical issues in modern cars: Many newer vehicles use electronic hood releases. A dead battery or faulty sensor can prevent the system from working.
Each of these problems has a solution. The key is identifying which one you are dealing with before you start forcing anything. Forcing a stuck hood can cause damage to the latch, the hinge, or even the windshield if the hood pops open unexpectedly.
It is also worth noting that some of these issues relate to broader car maintenance. For example, if you are noticing that your car is using more fuel than usual, a faulty hood latch is not the cause. You might want to check your fuel efficiency separately. You can read about how far 1 liter of petrol takes a car to understand your vehicle’s fuel consumption better. Keeping tabs on fuel economy helps you spot other mechanical issues early.
Method 1: Using the Emergency Hood Release
Most modern cars have an emergency hood release built into the system. This is your first line of defense when the primary latch fails. Here is how to use it step by step.
Step 1: Park Safely and Turn Off the Engine
Find a flat, stable surface. Turn off the engine and let the car cool down completely. Working on a hot engine can cause burns, and a car on a slope can roll. Safety always comes first.
Step 2: Locate the Emergency Release
Open the driver’s side door and look at the bottom of the dashboard on the left side. You are looking for a small lever or handle, usually colored bright orange or red. This is the emergency hood release. Different car brands place it in slightly different spots, so check your owner’s manual if you cannot find it.
Step 3: Pull the Emergency Release
Pull the lever firmly toward you. You should hear a clicking sound or feel the latch disengage. Do not yank too hard. A steady, firm pull is all you need.
Step 4: Go to the Front of the Car
Walk to the front of the car and feel along the hood edge for a gap. The hood should be slightly raised on one side. Reach underneath and feel for the secondary latch mechanism.
Step 5: Release the Secondary Latch
Use your finger or a flat tool to push or pull the secondary latch. The hood will pop up slightly. Lift it the rest of the way and secure it with the prop rod.
If this method works, you are in great shape. If not, do not worry. There are other methods to try.
Method 2: Manually Pulling the Hood Release Cable
When the emergency release does not work, the next option is to manually access and pull the hood release cable. This method requires you to get under the dashboard, so it is a bit more involved. But it is very effective.
Step 1: Gather Your Tools
You will need a flashlight, a pair of needle-nose pliers, and possibly a small screwdriver. Having these ready before you start makes the process much smoother.
Step 2: Remove the Lower Dashboard Cover
On most cars, you can remove the plastic cover on the lower part of the dashboard by unscrewing a few bolts or clips. Use your screwdriver or a trim removal tool. Be gentle so you do not crack any plastic pieces.
Step 3: Locate the Hood Release Cable
Once the cover is off, look for a cable that runs from the hood release lever toward the engine bay. It is usually a thin metal cable with a plastic sheath. Follow it until you find the end that connects to the latch mechanism.
Step 4: Pull the Cable Directly
Using your needle-nose pliers, grip the cable end and pull it toward you. This mimics the action of pulling the interior release handle. You should feel the latch disengage.
Step 5: Open and Secure the Hood
Go to the front of the car and lift the hood. Secure it with the prop rod or hood latch. Clean up your tools and dashboard cover, and you are done.
This method works well for vehicles where the release cable has snapped but the latch itself is still functional. It is a great DIY fix that saves you time and money.
If you are also curious about how different vehicle systems affect overall performance, you might find it interesting to learn at what speed a hybrid switches from electric to gas. Understanding how these systems work can give you a better picture of your car’s inner workings and help you diagnose issues more effectively.
Method 3: Using the Prop Rod or Hood Support
In some older vehicles, the hood latch is a simple latch-and-hook system. If the latch mechanism is completely jammed, you might need to use the prop rod to access the area and work on the latch directly.
Step 1: Find the Prop Rod
The prop rod is usually stored near the front of the engine bay. It is a metal rod with a hook or bracket at one end.
Step 2: Remove the Hood Seal
Carefully lift the hood seal or weather stripping around the hood edge. This gives you access to the latch mechanism from underneath.
Step 3: Manually Release the Latch
Use the prop rod or a similar tool to push or lift the latch lever. You may need to apply a bit of force, but go slowly to avoid damaging the mechanism.
Step 4: Open the Hood Fully
Once the latch releases, open the hood and secure it properly. Inspect the latch and surrounding area for any visible damage or debris.
This method is especially useful for older cars with simpler hood systems. However, be cautious. If you are not comfortable working with the latch mechanism directly, it is perfectly fine to call a professional.
Method 4: Using a Flat Tool to Release the Latch from Outside
If you cannot access the emergency release or the cable, you can try releasing the latch from outside the car. This method works best on vehicles where the secondary latch is accessible from the front.
Step 1: Find the Latch Area
Stand in front of the car and look at the center of the hood edge. You will usually see a small gap or slot where the latch engages.
Step 2: Insert a Flat Tool
Use a flathead screwdriver, a trim tool, or even a sturdy plastic spatula. Insert it into the gap and feel for the latch mechanism.
Step 3: Push or Lift the Latch
Gently push or lift the latch while someone else tries to lift the hood from the other side. Sometimes a two-person approach works best here.
Step 4: Secure the Hood
Once the hood pops open, secure it with the prop rod. Check the latch area for any obstructions or damage.
This method requires patience and a gentle touch. You do not want to scratch the hood or damage the latch housing. If the latch is severely corroded or damaged, this method may not work, and you will need to move on to professional help.
Preventing Hood Latch Problems in the Future
The best way to deal with a stuck hood latch is to prevent it from happening in the first place. Here are some simple maintenance tips that go a long way.
Lubricate the Latch Regularly
Every few months, spray a silicone-based lubricant onto the hood latch and moving parts. This prevents rust and keeps the mechanism operating smoothly. Do not use WD-40 as a long-term lubricant. It attracts dirt and can gum up over time. A dedicated latch lubricant works much better.
Check the Hood Release Cable
Inspect the hood release cable at least once a year. Look for fraying, rust, or slack. If the cable feels loose or shows signs of wear, replace it before it breaks completely. A new cable is inexpensive and easy to install.
Keep the Hood Seal Clean
The hood seal prevents water and debris from entering the engine bay. Clean it regularly with a mild soap solution. A dirty or damaged seal can lead to moisture buildup, which causes rust and freezing in cold weather.
Address Small Problems Immediately
If you notice the hood feeling stiff or the release handle feeling loose, do not ignore it. Small issues become big problems quickly. A quick visit to a mechanic can save you from a much bigger headache down the road.
Winter Preparation
In cold climates, ice and snow can freeze the hood latch overnight. Before winter sets in, apply a thin layer of silicone spray to the latch. You can also park your car in a garage whenever possible to reduce exposure to freezing temperatures.
Inspect After Accidents
Even a minor fender bender can misalign the hood hinge or damage the latch. Always inspect the hood mechanism after any collision, no matter how small. Early detection prevents costly repairs later.
Taking care of these small maintenance tasks keeps your hood release system in top shape. And when you do need to open the hood, whether for checking the engine oil, adding washer fluid, or inspecting the engine bay, the process will be quick and effortless.
For those interested in understanding more about vehicle systems, learning about fuel efficiency can be surprisingly helpful. Check out how far 1 litre of petrol takes a car to understand your vehicle’s fuel consumption patterns and spot potential issues early.
When to Call a Professional
There are times when DIY methods simply are not enough. If you have tried all the methods above and the hood still will not open, it is time to call in the experts. Here are signs that you need professional help:
- The latch mechanism is visibly damaged or bent.
- The hood hinge is broken or severely corroded.
- You cannot access the release cable without causing damage to surrounding components.
- The electronic hood release system has failed and the fuse box shows no obvious issues.
- You feel unsafe or unsure about any step in the process.
A qualified mechanic will have the right tools and experience to open your hood safely. They can also diagnose and fix the underlying issue, whether that means replacing a cable, repairing a latch, or realigning a hinge. Most hood latch repairs are quick and affordable, especially when you address them early.
Remember, your hood protects the engine and other vital components. Keeping it in good working order is part of basic car care. A well-maintained hood latch ensures easy access to the engine bay for routine checks, oil changes, and inspections.
Final Thoughts
Learning how to pop a hood without a latch is a practical skill that every driver should have. It saves you time, money, and stress when things go wrong. Whether you use the emergency release, pull the cable manually, or work the latch from outside, these methods are reliable and effective.
Start by understanding your specific vehicle’s hood release system. Read the owner’s manual, locate the emergency release, and familiarize yourself with the latch area. This preparation makes all the difference when you are facing a stuck hood in an inconvenient moment.
Maintenance is your best friend here. A little lubrication, regular cable checks, and prompt attention to small issues keep your hood latch working smoothly for years. And when a problem does arise, you now have the knowledge to tackle it yourself or make an informed decision about calling a mechanic.
Stay proactive, stay safe, and keep your car in top condition. Your hood latch is a small part of your vehicle, but it plays a big role in keeping you on the road.
Frequently Asked Questions
Can you open a hood without a latch at all?
Yes, you can. Most vehicles have an emergency release lever inside the cabin that disengages the primary latch. From there, you can manually lift the hood and secure it with the prop rod. If the emergency release also fails, you can access the hood release cable under the dashboard or use a flat tool to release the secondary latch from outside the car.
What tools do I need to pop a hood without a latch?
You typically need a flashlight, a pair of needle-nose pliers, and possibly a small screwdriver. For older vehicles, the prop rod that comes with the car is essential. A trim removal tool can also help if you need to remove dashboard covers to access the release cable.
Is it safe to force a hood open when the latch is stuck?
No, it is not safe. Forcing a stuck hood can damage the latch, the hinge, or the windshield if the hood suddenly releases. Always try the recommended methods first and apply gentle, steady pressure. If nothing works, seek professional help to avoid causing further damage.
Why does my hood latch freeze in winter?
Moisture enters the latch mechanism and freezes when temperatures drop below zero. This is especially common in older vehicles or cars that are parked outside without a garage. Regular lubrication with a silicone-based spray before winter can prevent this problem.
How much does it cost to repair a broken hood latch?
The cost varies depending on the vehicle and the extent of the damage. A simple cable replacement typically costs between 50 and 150 dollars. A full latch mechanism replacement may range from 100 to 300 dollars. Labor costs depend on your location and the mechanic’s rates.
How often should I maintain my hood latch system?
You should inspect and lubricate your hood latch every 3 to 6 months. Check the release cable for fraying or slack at least once a year. After any accident or collision, inspect the entire hood mechanism including the hinges and latch to ensure everything is properly aligned and functioning.