How Do I Reset My Maintenance Indicator?
How Do I Reset My Maintenance Indicator? It’s quick and easy once you know the right steps for your vehicle. Resetting the maintenance light helps you keep track of service intervals and avoid unnecessary dashboard warnings. Whether you drive a Honda, Toyota, or Ford, this guide will walk you through the reset process in minutes.
Key Takeaways
- Reset your maintenance indicator after every oil change to keep your car running smoothly.
- Consult your owner’s manual for the exact reset procedure specific to your vehicle model.
- Never ignore maintenance reminder lights, as they signal important service needs for your engine.
- A proper reset ensures your service interval tracking stays accurate and your warranty remains valid.
- Reset only after completing the scheduled maintenance to avoid misleading dashboard alerts.
- Regular resets help you stay on top of oil changes and routine vehicle upkeep.
📑 Table of Contents
- What Is a Maintenance Indicator and Why Does It Matter
- Common Reasons Your Maintenance Indicator Comes On
- How to Reset the Maintenance Indicator: Step-by-Step Guide
- How to Reset the Maintenance Indicator for Popular Car Brands
- Tips to Keep Your Maintenance Indicator From Coming Back
- When to See a Professional Instead of Resetting It Yourself
- How Mechanics Help With Maintenance Indicators
- Key Takeaways
What Is a Maintenance Indicator and Why Does It Matter
Your car talks to you. It does so through lights, sounds, and symbols on your dashboard. One of the most important messages it sends is the maintenance indicator. This small light or symbol lets you know when your vehicle needs scheduled service.
Many drivers ignore this light until it becomes a problem. That is a mistake. The maintenance indicator is not just a random warning. It is part of your car’s oil life system and service interval tracking. When it comes on, your vehicle is telling you it is time for routine care.
Understanding what this light means can save you money. It can also keep your car running smoothly for years. In this guide, we will walk you through everything you need to know about resetting your maintenance indicator. We will cover what triggers it, how to reset it, and when to seek help from a professional.
Think of the maintenance indicator like a reminder on your phone. It does not mean something is broken. It simply means your car is due for scheduled upkeep. Ignoring it can lead to bigger problems down the road.
Common Reasons Your Maintenance Indicator Comes On
The maintenance indicator can activate for several reasons. Most of them are routine and easy to fix. Here are the most common triggers:
Oil Change Reminder
The most frequent reason is an oil change reminder. Modern cars use an oil life system that tracks driving habits. It counts miles, engine hours, and even driving conditions. When the system determines your oil is near the end of its useful life, the light comes on.
Some vehicles use a fixed mileage interval, like every 5,000 or 7,500 miles. Others use a flexible system based on real-time driving data. Either way, the result is the same. Your service due light will appear on the dashboard.
Scheduled Service Intervals
Beyond oil changes, cars have multiple maintenance schedules. These include inspections of brakes, tires, filters, and fluids. Each of these services has its own interval. When you reach one of these milestones, the maintenance indicator may activate.
For example, your car might need a new air filter at 15,000 miles. Or the brake pads might need inspection at 30,000 miles. The dashboard maintenance light helps you keep track of all these intervals.
After Recent Service
Sometimes the light stays on even after you have had your car serviced. This happens when the service interval indicator is not reset properly. It is a common issue and easy to fix. We will walk you through the exact steps in a later section.
Electrical or Sensor Issues
In rare cases, a faulty sensor or electrical glitch can trigger the light. If you have recently had work done on your car and the light appeared afterward, it might be a sensor issue. This is less common but worth noting.
How to Reset the Maintenance Indicator: Step-by-Step Guide
Resetting your maintenance indicator is usually straightforward. The exact steps vary by car brand and model. Below is a general guide that works for most vehicles. Always check your owner’s manual for model-specific instructions.
Step 1: Turn the Ignition to the On Position
Do not start the engine. Simply turn the key to the “On” or “Accessory” position. On newer cars with push-button start, press the start button without pressing the brake pedal. The dashboard lights should illuminate.
Step 2: Locate the Trip Meter Button
Most cars use the trip meter button to access the maintenance menu. This button is usually located on the steering wheel or the instrument panel. Press and hold it for a few seconds until the display changes.
Step 3: Navigate to the Maintenance Menu
Use the trip button or steering wheel controls to scroll through the menu. Look for an option labeled “Maintenance Reset,” “Service Due,” or “Oil Life Reset.” The wording varies by manufacturer.
Step 4: Hold the Reset Button
Once you find the reset option, press and hold the button. Hold it for about 10 to 15 seconds. The display should show the indicator resetting. You may see a flashing light or a countdown.
Step 5: Turn the Ignition Off and On Again
After the reset, turn the ignition off. Wait a few seconds, then turn it back on. Check the dashboard. The maintenance indicator should no longer be visible. If it is still on, repeat the process.
Quick Tips for a Successful Reset
- Make sure the car is in a parked position with the parking brake engaged.
- Do not rush through the steps. Hold buttons for the full recommended time.
- Keep your owner’s manual handy for model-specific instructions.
- If the light returns after resetting, your car may still need service.
- Some vehicles require a professional scan tool for the reset. Do not force it.
How to Reset the Maintenance Indicator for Popular Car Brands
Every car manufacturer has its own reset procedure. Here are the steps for some of the most popular brands. These instructions are general guidelines. Always confirm with your owner’s manual.
Toyota and Lexus
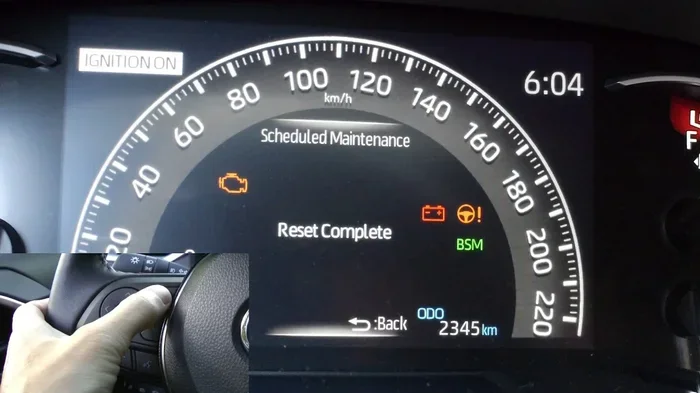
For Toyota and Lexus vehicles, start by turning the ignition to the On position. Press the trip meter button until you see the maintenance menu. Hold the same button for about 10 seconds. The service due light should blink and then turn off. Turn the ignition off and back on to confirm the reset.
Honda and Acura
Honda models typically require you to select the “Oil Life” display on the instrument cluster. Scroll to the reset option using the steering wheel controls. Hold the reset button until the percentage resets to 100%. This indicates the maintenance indicator has been cleared.
Ford and Lincoln
Ford vehicles use the message center on the dashboard. Navigate to the “Vehicle Info” menu, then “Maintenance” or “Oil Life.” Select “Reset” and hold the button until the display confirms the reset. The service interval indicator should turn off.
Chevrolet and GMC
For Chevrolet and GMC trucks and SUVs, press the steering wheel button to access the instrument cluster menu. Scroll to “Vehicle Information,” then “Maintenance Reset.” Hold the select button until the indicator resets. Turn the ignition off and back on to verify.
BMW and Mercedes-Benz
Luxury brands like BMW and Mercedes-Benz may use a slightly different process. Often, you need to access the iDrive or COMAND system. Navigate to “Vehicle Status,” then “Maintenance,” and select “Reset Service Interval.” Some models require a long press of the reset stalk near the steering column.
Comparison Table: Reset Methods by Brand
| Brand | Reset Access | Button to Hold | Confirmation |
|---|---|---|---|
| Toyota / Lexus | Trip meter button | Trip meter button | Light blinks, then off |
| Honda / Acura | Instrument cluster | Reset button | Oil life returns to 100% |
| Ford / Lincoln | Message center | Reset button | Oil life resets to 100% |
| Chevrolet / GMC | Steering wheel controls | Select button | Maintenance light off |
| BMW / Mercedes-Benz | iDrive / COMAND | Reset stalk or button | Service interval cleared |
Tips to Keep Your Maintenance Indicator From Coming Back
Once you have successfully reset the maintenance indicator, you want to keep it off. Here are practical tips to help you do that.
Follow Your Maintenance Schedule
The best way to prevent the light from returning is to follow your car’s maintenance schedule. Check your owner’s manual for the recommended service intervals. Stick to them. Regular oil changes, tire rotations, and fluid checks keep your car healthy.
Track Your Miles
Keep an eye on your odometer. Note when you hit service milestones. If your car needs an oil change every 5,000 miles, make a mental note at 4,500 miles. This proactive approach helps you stay ahead of the service due light.
Use Quality Parts and Fluids
Using the right fluids can extend the life of your engine oil. For example, using 5W30 instead of 5W20 when your manual allows it can sometimes improve engine protection. Always use fluids and parts that meet your manufacturer’s specifications.
Do Not Ignore Early Warning Signs
If you notice unusual sounds, smells, or performance changes, do not wait. Address them early. Small problems become big expenses when ignored. A quick check can prevent the maintenance indicator from coming back with a more serious issue.
Keep Records of Your Service
Maintain a log of all your service visits. Write down the date, mileage, and work done. This record helps you stay on track and gives you proof of maintenance if you ever sell the car. It also helps mechanics diagnose issues faster.
Understand Your Oil Life System
Modern cars use sophisticated oil life systems that go beyond simple mileage tracking. They monitor driving conditions like short trips, extreme temperatures, and heavy loads. If you frequently drive in harsh conditions, your system may trigger the maintenance indicator sooner. Understanding this can help you plan your service visits better.
When to See a Professional Instead of Resetting It Yourself
Most of the time, resetting the maintenance indicator is a DIY task. But there are situations where you should seek professional help.
The Light Keeps Coming Back
If you reset the light and it returns within a few days, something is wrong. This could indicate an unresolved service need or a faulty sensor. A mechanic can run a diagnostic check to find the root cause.
Multiple Warning Lights Are On
If the maintenance indicator appears alongside other warning lights, do not ignore it. This combination could signal a serious issue. For example, if you see the maintenance light and the check engine light together, it is time for a professional inspection.
You Are Unsure About the Procedure
Not all cars follow the same reset process. If you cannot find the instructions in your owner’s manual, ask a professional. Many auto parts stores and dealerships offer free reset services. It is a quick and easy fix.
You Recently Had Work Done
If the light appeared after a recent service, the technician may have missed resetting it. Go back to the shop and ask them to clear it. Most reputable shops will do this at no extra charge.
Sometimes the issue goes beyond a simple reset. If you are dealing with a car that has been overheating, you should check whether you can drive your car after it overheats before attempting any resets or further driving.
How Mechanics Help With Maintenance Indicators
Many drivers wonder what happens at the mechanic’s shop. Do they just reset the light? The answer is no. A good mechanic does much more than that.
During a service visit, the technician checks all the items on your maintenance schedule. They inspect the brakes, suspension, fluids, belts, and hoses. They also scan for any hidden error codes that might not be visible on the dashboard.
Some people worry about the cost of these visits. But think of it this way. Regular maintenance prevents expensive repairs later. A simple oil change costs a fraction of what a new engine costs. The maintenance indicator is your car’s way of protecting your investment.
You might also wonder whether mechanics do a lot of math when calculating service intervals. The truth is, they rely on both experience and your car’s computer system. The oil life system does most of the tracking. The mechanic’s job is to interpret the results and recommend the right service.
Key Takeaways
- The maintenance indicator is a helpful reminder, not an emergency signal.
- Common triggers include oil changes, scheduled services, and sensor issues.
- Resetting the maintenance indicator is usually a simple DIY process.
- Each car brand has its own reset procedure. Check your owner’s manual.
- Follow your maintenance schedule to prevent the light from returning.
- Seek professional help if the light keeps coming back or appears with other warnings.
- Regular service keeps your car reliable and saves money in the long run.
Resetting your maintenance indicator is one of those small car care tasks that makes a big difference. It takes just a few minutes and keeps your dashboard clean and your service schedule on track. Do not let that little light nag you any longer. Follow the steps in this guide, and you will have it cleared in no time.
Remember, the maintenance indicator exists to protect you and your vehicle. Use it as a tool, not a nuisance. Keep up with your service intervals, use quality parts, and your car will reward you with reliable performance for years to come. If you ever feel unsure, a trusted mechanic is always there to help.
Frequently Asked Questions
How Do I Reset My Maintenance Indicator After an Oil Change?
To reset your maintenance indicator after an oil change, turn the ignition to the “on” position without starting the engine. Press and hold the reset button on your dashboard or steering wheel until the light begins to flash. Release the button, and the indicator should reset to zero.
Can I Reset My Maintenance Indicator Manually?
Yes, most vehicles allow you to reset the maintenance indicator manually using a simple button combination. The exact steps vary by car make and model, so check your owner’s manual for the correct procedure. Typically, it involves holding a specific button while turning the ignition on.
How Do I Reset My Maintenance Indicator on a Honda Civic?
For a Honda Civic, turn the ignition to the “on” position and press the trip button repeatedly until the maintenance indicator appears. Then, hold the trip button down for about ten seconds until the light resets. This quick process works for most Honda models and takes less than a minute.
Why Won’t My Maintenance Indicator Turn Off After Resetting?
If your maintenance indicator won’t turn off, the reset may not have been completed properly. Try repeating the reset steps or check if your vehicle needs a specific service code cleared by a mechanic. A persistent light could also signal an underlying issue that needs professional attention.
How Often Should You Reset Your Maintenance Indicator?
You should reset your maintenance indicator every time you complete a scheduled service, such as an oil change or tire rotation. Most vehicles track maintenance intervals at 5,000 or 7,500 miles, depending on the model. Keeping up with regular resets helps you stay on top of your car’s service schedule.
Is It Safe to Drive with the Maintenance Indicator On?
Driving with the maintenance indicator on is generally safe in the short term, but it serves as a reminder not to skip scheduled services. Ignoring it for too long can lead to overdue maintenance and potential mechanical problems. It is best to reset the light after completing the required service.